DNA Phasing of 4 Siblings and One Parent: Part 7 (Starting Over)

In my last blog, I found a few errors when I was checking some odd results. This lead me to think that it would be better to start the phasing process from the beginning. The beginning means using 4 siblings’ raw data and my mom’s raw data. This time I will be more methodical and keep track of the results. I have a new spreadsheet called The Base Tracker. Every step that I take, it will keep track of the bases from each sibling when they assigned to a parent.

A New Table

First I’ll create a new table from the raw data. I’ll start with my mom, me and my 2 sisters as they are all tested using Ancestry Version 1.

3sibtable

I called the table tbl3Sibs.

Next, I combined tbl3Sibs with Jon’s Ancestry V2 results into a new table called tble4SibsNew. I made sure I had a right connect on the arrow. That means that I wanted everything in the 3Sibs table plus what was in Jon’s information. If I had left it an equal join, I would have lost the bases that are in Version 1 but not Version of the AncestryDNA results.

mergejonwsibs

It is important here to connect by rsid. I made the mistake of connecting by IDs last time. As the different AncestryDNA test results versions had different ID’s, this produced crazy results. I also used only Chromosome 1-22 as there are too many special cases for the X Chromosome.

tbl4sibsr1

Then I used a count function to count the number of bases each sibling had. I also figured out how many blank lines there were out of the 682549 and subtracted those 8229 sibling blanks from the total to get 674,320. I’ll use that number to figure out the percent phased. This is the Count Query showing the Totals button in the Access Ribbon:

countrawbases

The results of this query were put in the RawBases Row below.

My New Base Tracker: % Phased

basetracker

The first column has the step taken. P1 is Principle 1. JoelFD is the Joel from Dad column, so all the Dad bases are on the left and mom bases are on the right. This table will give me the % phased for each sibling.

Principle 1 Query – Homozygous Siblings

This Principle is on the Principles from a Whit Athey Paper where you have 2 bases the same and each one is from each parent. The last time I did this, I may have had too much in a query at a time. This time, I’ll do the query separately for each sibling.

First, I opened up my tbl4SibsNew in design view and added more fields to put the new dad and mom bases.

newbasefields

First, I copied the table, so I’d have the raw data table with no additions. I called my new table tbl4SibsNewPrinciples. That is where the phased bases will go.

Here is a simple Principle 1 Update Query for me:

joelprinciple1

It says where I am homozygous, put both those bases in my JoelFromDad and JoelFromMom columns in the new tbl4SibsR1Principles.

joelprq

That little query phased over 900,000 of my bases into Paternal and Maternal sides.

I was interested in seeing the effect of Jon’s testing using AncestryDNA V2:

jontracker

Jon has a ways to go to catch up on being phased. This is due to the differences in AncestryDNA V1 and V2.

Principle 2 – Homozygous Mom

Here if my mom has the same base twice, one of those has to go her child. Here is a query to update my mom bases. As my dad’s DNA was not tested, he gets a non-applicable in that column.

joelpr2

Note that I have a criteria ‘Is Null’. This means only update this base if there is a blank there already. Here is the Principle 2: Homozygous Mom summary:

p2summary

Here I don’t know why my Principle 2 Bases were so low. I think it is because I made a mistake above, so I’ll do these steps over from the beginning.

Here I get more consistent results for my mom bases:

pr2joelfix

Here is the revised Principle 2 Summary:

prtrackerrev

Jon’s results also changed to be more realistic to where he was after Principle 1. I can also use the Access Count function to check these numbers:

countpr2

All the numbers match up except for JonsFromMom. For some reason, the spreadsheet is showing a higher number of Total Bases from Mom for Jon of 540956. If I subtract that from his Principle 1 bases from Mom, I get 272250. I’ll put that in as his Principle 2 bases from mom and assume that I made a mistake in writing down Jon’s Principle 2 base from Mom number.

pr2summaryreconciled

I suppose it’s like reconciling my bank statement. I assume that these are Jon’s mom bases filling in where Jon didn’t have test results that lined up with the AncestryDNA V1 results for his mom and siblings.

Moving On To Principle 3: Heterozyous Siblings

This works when the child is heterozygous and has one base phased to one parent. Then the other base is phased to the other parent. It appears that this would have to work just from the mom side for now to fill in the dad side. That is because we haven’t filled in the ‘fromDad’ side with any Heterozygous sibling results yet.

pr3joel

This query says in the situation where I am heterozygous and I get my allele2 from mom, assign my allele1 to be from my dad. But only do that where there isn’t already a JoelFromDad base there.

However, this raises a question. Here is the same query without the ‘Is Null’ criteria:

pr3joellarge

As you can tell, I am beginning to doubt my work. The question is, if there has been no previous addition of Joel bases from dad based on my heterozygous results why is there a difference between the two queries?

I checked Sharon’s results and found that she didn’t have the same situation. Where she was heterozygous, she didn’t have any bases from dad assigned to her.

Here is a query showing my problem:

p3problem

It is not a problem for phasing, but more for what I will enter into my Base Tracker. Fortunately, I can do a Count Query:

countjoelfromdad

This shows that my JoelFromDad bases have gone up by 25589 somehow since I last tracked them. This means that I should use the larger number for my Base Tracker.

Here is the Principle 3 Summary in my Base Tracker:

p3summary

In a few hours, I’ve phased over 4 million bases. And that time includes making mistakes and fixing them. All siblings are phased at over 80% at this point except for Jon. His Paternal phasing is lagging at only at one half.

I suppose that this is the time for me to say that it takes 20% of your time to get 80% of the result and 80% of your time to get the last 20% of your result.

Summary Part 7

  • After making mistakes, it feels good to start with a clean slate
  • Principals 1-3 of the Athey paper are easy to implement using MS Access
  • If a mistake is found, it is usually good to start from a clean table of data and fix it from there
  • The Patterns don’t lend themselves as well to Access and take more time to get
  • Having a Table to track the work and results is helpful and interesting.
  • In the next Blog (Part 8), I will be back looking at filling in the Patterns areas

Raw DNA Phasing of 4 Siblings Using One Parent’s DNA: Part 6

In my last Blog, I was still playing catchup in going from my original 3 sibling phasing, to incorporating my brother’s new DNA results.

Missing Principle 2 for Jon

Here is Principle 2 from the Whit Athey Phasing Paper I’ve been using:

Principle 2 –If data from one of the parents are available, and that parent is homozygous at a SNP location, then another almost trivial phasing is possible
since obviously that parent had to send the only type of base s/he had at that location to the child
I checked this in MS Access. Here is the query:
homozygousmom
This says if mom is homozygous, here allele1 is the same as her allele2. For those if Jon has null values in his FromMom column, then I skipped this step.
homomomerror
Clearly, I did mess this step from position one. As I was doing my previous steps, I thought that Jon’s results were very sparse.
principle 2 fix

For this, I will again use the update query.

homomomfix

In this case, I didn’t bother writing ‘Is Null’ under the JonFromMom column. That is because even if there is something in there, I would just as soon overwrite it, as this is such a basic principle. I only missed 481,000 rows.

second part of fix

Now that I have mom’s bases, I will go back and fill in Jon’s dad bases based on his mom bases. Those are also Principle 2 fillns where Jon is heterozygous. I don’t mind doing these updates in Access as they are so easy.

dadsbasefrommomjon

This says in the case where Jon is heterozygous and his mom has allele1, put Jon’s allele2 in as Jon’s allele from Dad. This query says if a Jon’s has allele1 from his Mom, the allele2 has to go to his dad.

jonallele1fordad

So that is an easy way to update over 7,000 rows in a few minutes.

Next, On to Mom Patterns

It’s a good thing that I added these mom bases to Jon, because now it is time to look at mom patterns. From Athey:

In the next step, we use the pattern on the mother’s side to fill in as many more cells as possible. Finally, we can project the information in those newly filled cells back to the father’s side using Principle 3 again.

 This procedure will be the same one that I used for the Dad Patterns.
aaab mom pattern
 I might as well go in alphabetical order. In this pattern, Jon will not match the other siblings.
aaabmompattern
This works, but it doesn’t include the areas where there are missing mom bases. So I will use it to get rough ID’s. There were about 45 AAAB Mom Patterns that I found. Perhaps the rough ID’s will do.
AAAB Quality Control

My spreadsheet counts the numbers of ID’s between patterns.

aaabqc

619 is close to the cutoff that I had set. I went back to the original spreadsheet and found other AAAB patterns between the Stop and next Start. So I can combine those 2 AAAB Chromosome 15 patterns. I checked another pattern with about 700 ID’s from the Stop to the next AAAB Start. However, there was another pattern between, so those were a valid Stop and Start. There were about 45 AAAB Mom Patterns or about 2 per chromosome which seems like a lot.

ABAA Mom Pattern

The query should be similar to the previous one. If Sharon isn’t the same as her siblings, we will have an ABAA Pattern.

abaaqpattern

This pattern was easier to figure out. There were about 35 of them.

aaba Mom pattern

This is the one I should have done second if I had wanted to stay in alphabetical order. I checked a few with differences of about 500 between Stop and next Start, but they looked OK. There were a few single allele patterns.

aabb mom pattern

I have 3 criteria for this one:

aabbmompatternquery

I had to enter that Sharon’s allele from mom could not be the same as Heidi’s allele from mom or I would get a lot of AAAA Patterns. When I looked for these, there appear to be 19 AABB maternal patterns.

abab mom pattern

Again, this is a bit out of alphabetical order. This query is not unlike the previous one.

ababq

When I make Heidi’s mom base different from Sharon’s mom base, that gives me the ABAB pattern:

ababresults

Here I have Excel on the left where I am entering the results from the Mom Patterns that I found in Access.

ababworksheet

The jump in Chromosome 4 from position 6M to 37.9M indicates a change in pattern. That is entered in Excel on the left. The change from the previous pattern is shown as 7544 ID’s. ID’s should be the same as SNPs.

A change in Chromosome is an obvious Stop and Start:

ababex

There were about 30 ABAB mom patterns for me and my 3 other siblings. I’ve done:

  • AAAB
  • AABA
  • AABB
  • ABAA
  • ABAB
abbb mom pattern

It looks like this must be the last Mom Pattern. This is the mom pattern where I show my individualism – unlike my siblings who have the same mom base:

abbbq

Here’s an ABBB example:

abbbex

In this case on Chromosome 9, there is a jump from position 38M to 71M. However, the SNP (or ID) count between the two is only 190. That means this must be an area where the SNPs are not counted for some reason, so I would think that I could continue the Mom Pattern through that area. However, when I look at my Access table, I see this:

chr9ex

Above ID 370485 is a different pattern of AABB in the last four columns. This would have come out when I merged all my patterns and I would have had to fix it then. However, I might as well get this as good as I can now. As it is, there will be a discrepancy to work out:

chr9discrepancy

The AABB pattern started at 369193 which is before the ABBB Pattern stopped at 370295. This means I need to go back to the Table:


chr9problem


Here is position 370295 where I had the ABBB Pattern ending. However, this is a a very small pattern, going only up to ID# 370290. Before that is the AABB pattern again. Here the AABB Pattern picks up again.

chr9aabb

Here is how I corrected my Chromosome 9 Mom AABB Pattern:

chr9aabbcorrected

However, note that I had to break my 500 ID/SNP rule. That 51 represents the tiny ABBB Pattern between two AABB Mom Patterns.

Here is the start of the AABB pattern at 369193:

morechr9issues

First note, that it would actually start at 369192. Before that is a single ABBB pattern. Then above that in the first row is an ABAA pattern. The first row is the end of an ABAA Pattern that I already recorded in my spreadsheet at ID# 369181, so that doesn’t need to change:

chr9abaa

At 369190 there is a single pattern of ABBB. This will be noted in my spreadsheet, but not entered as a start/stop position.

Re-Sort the Mom Patterns by Pattern

Now I have 426 lines of Mom Pattern Locations. I need to sort them by pattern and hope there are not many weird issues like I found in Chromosome 9. I will also take out the single patterns. When I do this, I get quite a mess. Here is Chromosome 1:

chr1mompatternsorted

Here we have quite a few nested patterns.

chr1fix

The first AABB pattern is a single, so I can take that out, but what do I do with the AABB Stop? It looks like that was a single also, so I can take that out.

chr1fix2

The AAGG is between a CTTT and an AGG? which would turn out to be an AGGG. What I had previously described was a single pattern going to another single pattern within a valid non-single pattern.

Next, starting at ID# 6608 I have three starts in a row which cannot be good. Looking at the first two patterns of ABAA and AABB, they look like they could be good.

fixchr1

I’ll add a ‘G’ where the cursor is above and call that the end to a very short ABAA Mom Pattern.

chr1fix3

Here is the corrected ABAA stop. I highlighted the next ABAA Stop in yellow as that will need work.

Next I’ll look at the ABBB Start at 19885. It looks like I missed the previous AABB Stop at 19884.

chr1fix4

 At least that makes for a clean cut. I made a note of my correction:
chr1fix5
I also made note to look at the next AABB Stop (in yellow). Now there is a Start for an ABBB followed by a Stop for an AABB which looks fishy. Here is the area following ID# 19885:
chr1table
It seems that there are about 5 ABBB patterns followed by a single AABB Pattern, a single ABBB pattern and another AABB Pattern. As this looks confusing, let’s look at the full table for the single ABBB Pattern area at ID# 19905:
fullspreadsheet

Time for Quality Control

Are there any errors here? Principle 1 says that if a person is homozygous, then one base is from the dad and one is from the mom. I have CC and Jon has TT. My assignment is correct, but Jon is missing a T from his dad.
Let’s look at this Query:
jonqc
This looks for missing Dad bases for Jon that should be there where Jon is homzygous. It turns out he is mising about 1300 results:
jonqcresults
I ran this query to see if Jon was missing any mom bases and he wasn’t. I also ran this query for myself and saw that I was missing dad bases. I will have to re-run this update to the current table. This is not a problem as this is an easy thing to do in Access.

Just Like Starting Over

Based on the errors that I’ve found, I will start from scratch in Part 7

A Hartley Z17911 STR Tree

In my previous blogs on Hartley YDNA, I mentioned that my terminal SNP is Z17911. That is a part of the L513 Branch of the larger L21 Branch of R1b. Here is what the L513 Branch looks like. This Tree represents those who have taken the Big Y Test in the colored area above.

l513chart

My Hartley Z17911 is difficult to see but it is slightly to the left of the middle and to the left of an orange area. The checkerboard pattern shows the part of England that my Hartleys are from. As far as I know I am the only Hartley that has had SNPs tested positive for Z17911, or for L513, for that matter.

STRs and Z17911

However, quite a few Hartleys have tested their YDNA. They have tested STRs. As a result, it is possible to do a comparison to others taking this test. STRs are not SNPs which are a more definitive designation of where you are on the Y Tree. However, they can suggest what SNP you should belong to. I belong to an L513 and the Administrator Mike is actively looking for others that might be in L513. As a result, Mike has put out lists of people that appear to be L513 based on their STR patterns. I have mentioned in past Blogs that some of those people are Hartleys.

Here is a recent list:

suspectedz17911

The first on the list above is me. Then follows three other Hartleys. Administrator Mike has grouped these other 3 Hartleys next to me. Based on their STRs, he has grouped them as Z17911. This is even though these 3 have not tested for Z17911, L513, or probably not even for L21 which is way up on the Y Tree. The row with the orange, green and yellow above the results has what is called STR Rates. These are the rates at which each individual STR mutates. Some are very slow and some mutate relatively quickly. The selected mode above is likely the mode of L513. This will come in handy later on in this Blog in a few ways.

Z17911 and Signature STRs

It turns out that STRs form themselves into groups. That means that for groups of people that are related by YDNA have combinations of STRs that are almost always unique to that group. Here I will make an assumption that the other 3 Hartleys are indeed Z17911, even though they haven’t tested their SNPs.

In the results section to the right of the Hartley names are the values for each STR marker. The colored values are the ones that vary from the L513 Mode. These values, especially the ones that are in the darker colors will result in a signature for these Z17811 Hartleys. The darker colors indicate more of a variance or distance from the mode. Another way to put it, is that the L513 mode is the older value and the Z17811 Hartley numbers are the newer values for the STRs that have mutated away from the L513 mode.

Up or Down?

These Z17811 STRs may mutate up or down. The blue shaded numbers are going down and the reds are going up. Why is this important? It is important as I’d like to build a tree from these 4 Hartleys. I will need to know who is descending from whom. Or at least, which of the 4 branches of Hartleys may be the oldest.

Here is an example:

str-example

These are some of the results of our 4 presumed positive Z17911 Hartleys. It is  difficult to create a mode of these results as the mode is the value which occurs the most. If there are 2 of each value, which value do you use? This happens the #449 Marker results. I am 31 at the top, but there are two 31’s and two 32’s. I have the L513 mode at the top of the image. The value for Marker #449 is 29. That means I have the older 31 value and the other 2 Hartleys have newer 32 values. They are moving away from 29.

Defining Hartley Z17911 STRs

Next, I looked at all the STRs where the 4 Hartley had different results. The other results are interesting but in comparing Hartley to Hartley they don’t matter if they are the same. Well, they might matter if there was a STR that mutated up and back down again, but the chance of that happening should be relatively rare.

hartley-strs

Here I have compacted 67 STR results to 12. This is a good time to point out the STR rates. The rate for 447 is about 0.09. The rate for CDYb is 35. That means that CDYb will change over 350 times as fast as 447. Another point is that Hartley #4 seems to be a special case. He was categorized as a non-L513 person which was thought by the L513 Administrator Mike to be a mistake. I don’t know if that was ever resolved. I do note that some of his STRs are a bit different than the other 3 Hartleys, but not totally different. I also note that he has tested positive for R-L21, so perhaps this has been resolved.

But Wait, There’s More

I had forgotten, there is one more Hartley in the group. He doesn’t have a Hartley last name but believes that he is descended from the Hartley Line. Great news. I will call him Hartley #5.

5-hartleys

Previously, I had missed Marker 481. Also when I copied things, my numbers didn’t get colors, but that’s alright. Now I have 13 markers and 5 Hartleys.

References for Trees

I’m aware of 3 references for creating STR trees.

  • Robert Laurence Baber – He has written quite a few articles on STR trees. I have not read them all yet. I downloaded a 5 part study he wrote but I don’t totally understand his method yet – though I understand some of the principles. He uses an upstream STR mode as I tried to do above.
  • Robb Hand Drawn Tree example – He compares a hand drawn tree to the Fluxus software. Although he likes the hand drawn version better, he learns some from using difficult to use the Fluxus software
  • Gleeson STR Tree – Maurice Gleeson gives a method and example of how to build a STR tree

More on Modes

I seem to be getting hung up on Modes:

more-modes

Here I have the L513 Mode and various modes from downstream SNPs. The 458 mode went quickly from 17 for L513 to 19 for S5668 and then appeared to stay there for quite a while.As a result, I chose 19 for the mode. Had I just looked at the older L513 Mode, I may have come to a different conclusion as to which way this STR was mutating.

Then the very fast CDYb seemed to move up in a regular way through the ages. Of course, in reality, it could have gone up and down over that period of time, but we wouldn’t know it if it did. I picked the lower 39 value for the CDYb STR at the Hartley mode level. To the right, I have the GD or generational distance from the Hartley Mode. This says that these Hartleys should be related at about the same level – around 4 or 5 GDs or STR mutations.

A 5 Hartley Likely Z17911 STR Tree

Here is the tree I came up with. It is along the line of and in the form of the Gleeson STR Tree example mentioned above:

5hartleytree

  • The Hartley common ancestor’s signature STR values are listed at the top. The mutations from that are shown down the branches to the individual Hartleys.
  • I also added some dates assuming that on average, a STR will mutate every 170 years given a test of 67 STRs. The lower horizontal lines above happen at the 2 or 3 STR mutation rate (which is the same as the GD). The top horizontal line happens at a GD of 4 or 5. The Hartley #5 horizontal line is up higher as the 358b mutation is a double one from 16 to 18.
  • In the above scenario, Hartley #5 is by himself. Another scenario would have Hartley #4 and Hartley #5 together as they share a mutation at 389b. Instead, I chose the above tree due to Hartley #1, 4, 3, and 2 each sharing 2 STRs.

This image shows some of my rationale for the tree:

5hartley-groping

I chose the double combo of 25-32 that Hartley #2 and #3 shared. I also chose the double combo of 17-40 (in yellow) that Hartley #1 and #4 shared. Other possible single combos that I didn’t choose to group were the two step 16>18 mutation for Hartley #4 and 5, the 11 mutation for Hartley #1 and 5 and the 16 mutation for Hartley #1 and 3. The principle used is to try to get the tree as simple as possible. This is what Gleeson calls the parsimony principle. My assumption is that my groupings achieve that goal.

How Do the Hartleys Compare to the Z17911 Mode?

In comparing Hartleys to the Z17911 Mode,  I go from the age of surnames to before the age of surnames. There are 4 that have tested positive for Z17911. They are Hartley (me), Goff, Thomas and Merrick. In that group, the level of GD’s and the variance in surnames indicate a pre-surname common ancestor.

So the GD’s will be further back also.

z17911gds

Here I am assuming no back mutations. Under the previous tree I assumed that Hartley #5 had a back mutation at CDYb. Due to the volatility of this marker, it is sometimes ignored in these analyses. Notice that now the range of GDs is from 3 to 8. Again, I group Hartley #1 and #4 together and Hartley #2 and #3 together.

z17911tree

Hartley #4 has the GD of 8. This is due to 2 double mutations. That pushes back his connection to Z17911 to around the year 600. This seems to be pushing back to a possible age of Z17911. Z17911 positive Thomas has submitted his Big Y results to YFull, so I am hoping to get a date from YFull for Z17911. It will be interesting to see what they come up with. The structure of the tree is the same as the previous Hartley Tree. I just adjusted the relative heights of the horizontal arms.

Summary and Conclusion

  • STRs from 5 Hartleys who have tested their YDNA seem to indicate a relatively close relationship – at least in YDNA terms
  • I have had my SNPs tested and the administrator of the R1b-L513 project has grouped the other STR-testing Hartleys in the same Z17911 group as me based on similar STR patterns. That is quite a way down the SNP tree.
  • If any of these Hartley were to test for for the L513 SNP or further down for Z17911, it could confirm what the STRs seem to be saying. Then I wouldn’t be the lone SNP tested Z17911 Hartley
  • SNPs create a solid reliable marker for relationships. It is best to have the SNP relationship established through testing before doing this type of STR analysis. However, even without SNP testing, STR trees can be informative
  • Back mutations and the different mutation rates leading to unpredictable STR mutations are the 2 major variables that make STR testing less accurate than SNP testing
  • The weakness of the SNP testing is that many have not done it. The other issue is SNP testing may only take you up to a certain date. After that date, STR analysis is  more useful
  • STR testing is best used in conjunction with SNP testing
  • Making a STR tree takes some practice and knowledge of STRs and mutations.
  • This YDNA research and resulting connections could shed light on the history of this branch of the Hartley family over the past 400-1400 years or so.


Raw Data Phasing Part 4: Going from 3 Siblings to 4

In my last Blog, I mentioned that my brother Jon’s DNA test results came in this week. This happened in the middle of my attempt learn how to phase the raw DNA data for my 2 sisters and myself. I was phasing the data in what I can only assume is a traditional way. I say I assume, as I haven’t seen any other blogs on the process. The difference is that I am using MS Access which I hope will speed up the process. I should be able to get results for 23 chromosomes at a time instead of just one at a time.

The arrival of the new DNA results poses at least two problems:

  • The previous 4 DNA data files were all in AncestryDNA version 1. Jon’s is in AncestryDNA2. While they are all Build 37, they look at somewhat different points on the chromosomes
  • One of the difficult parts of the previous process was identifying and dealing with patterns of phased paternal and maternal bases. Those patterns were AAB, AAB, and ABB. With 4 siblings, there will be more patterns. However, the Whit Athey Paper I have been following does also look at 4 siblings.

AncestestryDNA Version 1 Vs. AncestryDNA Version 2

My understanding is that Ancestry changed the locations on the chromosomes that they were testing to get more into the medical area like 23andme. I don’t know if that is true. Here is a chart comparing the different atDNA tests:

ancestrydna-compared

I was doing well comparing Anc1 with Anc1 as I was looking at over 700,000 base pairs among 4 people. Once I compare Anc2 to Anc1, that is number is cut down quite a bit. That is about a 40% drop. My only other option, other than re-testing Jon, is to compare Jon to my mother’s FTDNA results. However, that will only pick up 2-3,000 SNPs, so I won’t bother.

Back to Square One with 4 Siblings: Homozygous Siblings

I need to find Jon’s equal base pairs and apply one to his ‘from dad’ column and one to his ‘from mom’ column. That is, after I add all Jon’s data to my database and add those columns. First I need to decide where to add Jon’s data. I could add it to the beginning of what I have already done or to the end. I’ll try adding it to the end, because I think that the work I did already is OK. I want to build on that. So rather than adding Jon’s DNA to the first step, I’ll add it to my table called tblMomBaseFromDadBase. This table has over 700,000 lines of bases for 4 people. Jon’s has 668,942 lines. Actually, when I remove “Chromosomes” 24-26, I will only have 666,531 lines.

Querying Jon into my latest table

Here I am adding Jon and the Mom from Dad Table to my query design:

adding-jon

Access thinks the ID that it added was important, but it really isn’t, so I need to take out that equal join. I really want the join to be at the rsid, but I don’t want an equal join. Why not? If I had an equal join, I would end up only with the positions that Jon has. I will lose 40% of the work that I have already done. Instead, I’ll use an unequal join.

unequal-join

I flipped the 2 tables in the query design area, so things are moving left to right. Then I choose a #2 join which is basically, an unequal join left to right.

Actually, I changed my mind. I have a better idea. I will just do the first 2 steps on Jon’s raw DNA and then join the results together. That is a third way that I hadn’t thought of. The point is, that there are many ways to do things in Access. There can be more than one way to get to where you want to be.

Back to Homozygous Siblings

First I copied Jon’s raw data into a table called tblJonHeterozygousSib. This is so I can use an update query to update the data in the new table and still have the original. Hold that idea. The better idea is to use a make table query. The reason that this is better is that it can take out the “chromosomes” I don’t want:

make-table-query-jon

I took out the table I copied and I’ll make a better one with only Chromosomes 1-23. I hit the Run button and create a table with 666,000 lines:

jonhomosib

Then in the above table, I inserted 2 rows: JonFromDad and JonFromMom. Now this table is ready to phase for any homozygous siblings. By the way, it looks like my Chr23 or X is homozygous, but it isn’t. Ancestry adds an extra base. I only really have one for my X Chromosome.

Finally time to query and phase

I go to Query Design in Access and choose the above table. This is a very simple Update Query design:

qrysibhomojon

This says if Jon’s allele1 is the same as his allele 2, put allele 2 as his base from mom and as his base from dad. I hit the run button for the update and get the dire warning that I’m updating a lot of information, I can never change it back. Then I get a message that I’m updating 478,000+ rows. That is good. Those are the number of Jon’s homozygous bases – quite a few. I’d say over two thirds.

I’m not looking for crazy results and didn’t get any.

Homozygous Mom Query

I’ll copy my previous table into one to update. Then I need to add Jon’s base from mom where mom is homozygous. Easy peasy. I think this is all I need.

momhomoupdatequery

Actually, I did think of an issue. I have an equal join. That means I won’t be using the homozygous bases that mom tested for in the old AncestryDNA test that aren’t in the new AncestryDNA test list. My guess is that is interesting information but perhaps not very useful. It also occurs to me that in the spots where Jon doesn’t match up with my siblings, I will still have the 3 letter pattern work that I had done previously.

The query above says if Mom allele 1 = 2, then put that 2 allele in Jon’s from Mom base slot. I hit Run and pasted 277,000 rows of bases.

homomomforjonresults

This query will be a little more difficult to check. I have to create a query linking my mom’s DNA results to this table. I did that and see one problem already.

momrawtojonfrommom

The first problem is that ID 126 didn’t show up. That means that rs3819001 that Jon has is not in my mom’s raw DNA. I don’t want to have data for Jon that looks like it can be updated, but it can’t.

I think I can fix this.

Updated Table Query

A few steps ago, I ran a Table Query to get just Chromosomes 1-23 into Jon’s Table. I need to upgrade that query so that I am only including the locations (rsid’s) that are common to both my mother and Jon. I do this using an equal join on the rsid Field:

updatedtablequeryforjon

This time, my table for Jon only has the rsid’s that my mom has.

newtable-upda

Also my Chromosome formula was off, so I had to fix it. Also note that I have about the number of rows as per my Anc1 vs. Anc2 table earlier in the Blog. I then re-added the Jon from Dad and Mom columns into the new and improved table. Then I reran the update query which told me I was about to update 284,000+ rows.

homozgygousjonupdate

This worked as well as last time, but this time I have the fewer rows I was trying to get.

Re-Run the update query for homozygous mom for jon

I double clicked on my old update query. The message said I was updating 277,000 rows or so. Now I’ll re-check my work. If there is no ID 126, I’ll be happy. Well it is still there, because I forgot to copy the previous homozygous sibling table into the homozygous mom table. After re-re-running the update, I got the desired results:

tableno126

And there you [don’t] have it: no ID 126. Here is my mom’s raw file compared to Jon’s updated table.

momrawtojonfrommom

Jon gets a G from mom at ID 128 even though Jon is AG, because mom is GG. Now I’m talking DNA.

Merge Jon’s New Table with His 3 Siblings’ Tables

This is the point where I put everything together. I will try to use the Make Table Query for this one again. So I’ll put my newest Jon table together with my newest sibling table.

left-to-right-merge

This shows the left to right arrow join. I’ll want the larger file plus everything equal in the smaller file. Come to think of it, this Create Table Query would have fixed the earlier problem I had. I guess I was too careful! The other issue is that the ID in the 1st table won’t be the ID in the second table. I could keep the second ID, but I would have to rename it as Jon ID or Anc2ID.

newidtablemerge


Here I rename Jon’s IDs as JonID. I may not need it, but if I do need it I will have it. I guess MS Access wasn’t happy with my idea:

autonumber

OK, I took out the JonID and hit Run. Microsoft tells me about my new 700,000 row table.

Back to the Dad Patterns

Now that all the family is together I want to look at Dad Patterns, because I know that I will be updating those. Here is the first query I tried on my new Table of 4Sibs.

sharon-not-joel

This is looking for filled in Dad bases where Sharon’s base is not the same as Joel’s. That query gives me an ABAA pattern:

abaa-pattern

Also ABBB:

abbb

Here’s ABBA:

abba

It looks like ABAB is a possibility also. That means the following are possible:

  • AAAB
  • AABA
  • AABB
  • ABAA
  • ABAB
  • ABBA
  • ABBB

So if I chose Joel’s Base not equal to Sharon and then Joel’s base equal to Sharon would I have every combination? It looks like I need this combination to cover all possibilities:

  • Joel <> Sharon OR
  • Joel<>Heidi OR
  • Sharion<>Heidi OR
  • Heidi<>Jon OR
  • Jon<>Joel OR
  • Jon<>Sharon OR

Which in Access looks like:

access-pattern-combos

But Wait, I Forgot Principle 3 for Jon

Principle 3 says where Jon is heterozygous and he knows where he got his maternal base, the other base goes into his From Dad column. Looking back at my old queries, I see this is a 2 step query. I’m tempted to try this in one step, but I think  this got me in trouble before, so I’ll go with the simpler query. Simpler queries are usually better in MS Access.

jonhetero

This says where Jon is missing a phased allele from Dad and he has an allele that doesn’t equal the one he got from mom (making Jon heterozygous here) put that allele into Jon’s From Dad spot. I tried the query and only got 37 results. The problem is, I should have said ‘Is Null’ in the JonFromDad Criteria:

jonheteroisnull

This time I get 35,000 updates, so that is right. I then change the allele1’s to allele2’s above and get 33,000 updates to tbl4Sibs. I ran a quick query on the 4Sibs Table to get just Jons heterozygous results:

jonheterocheck

In the first line, Jon had allele1 as T which was different from the allele from Mom of G, so Jon’s T got put into the From Dad spot. At ID 41, Jon’s allele2 of G is from Dad because he had an A from Mom. When parent and child are heterozygous, the From Parent location remains blank.

Now I have Jon with 3 Principals: Homozygous Jon, Homozygous Mom and Heterozygous Jon.

Back to Dad Patterns

I have the old Dad Patterns for 3 siblings. Now I need to See what the 4 sibling Dad Patterns would be and add Jon’s Start and Stop Locations for his new Dad Pattern Areas. I need to combine that with the 3Sibs Table.

wrongpattern-query

My first query was wrong and gave bad results. The reason is that the ID for 4Sibs was from the raw data. The ID for the Dad Pattern Table just numbered the amount of Dad patterns. I needed to join the ID in the first table to the start and stop locations in the second table. I ended up doing 2 queries: one for the start position and one for the stop as I needed both. This query gives the stop position of a pattern.

stop-query

I took both those queries and put them into an Excel Spreadsheet.

excelstartstopfromaccessdad

I added a new column called Dad4Pattern. In the first row, the new pattern was AAA by chance. However, in the second row which is the Stop or End of the first Dad Pattern, it is obvious that the ABA Dad Pattern goes to an ABAA Pattern. I didn’t think that there would be many AAAA Patterns as that means that all siblings match the same Paternal grandparent. This is the only AAA pattern that I had noted so far as I wasn’t looking for them yet. Still, I will need to go back and verify that these Start and Stop AAAA’s were not by chance. Finally, on the last line, it is clear that the Dad Pattern goes from AAB to AABB with Jon added.

Next I chose all the cells where Jon had a base from Dad and performed a Concatenate operation to write the pattern.

concaternate

This gave me the CCCC that I wanted to check. Next, I wrote a formula to put the Dad bases together in a new column and wrote down the Dad Patterns that I had.

newdadpattern

A few notes:

  • Out of the 66 three sibling patterns that I had, I was able to find all but 5 new four sibling Dad Patterns. See the yellow above for two of the missing 4 sibling dad patterns.
  • The missing 4 sibling dad patterns should be easy to find by scrolling through the 4Sib Table
  • I noticed that there were no AAAB patterns. That is because in my previous search, I was not looking for AAA patterns. So now, I don’t have any AAAB patterns. I will have to find these in my new search.
  • AAAB is the situation where I match the same paternal grandparent as my 2 sisters, but Jon matches the other paternal grandparent.
Filling in more dad patterns

To fill in the yellow areas, I made a query in Access based on the 4Sibs Table. This looked at every case where Jon had a base from Dad. Searching around the ID 6604 and after, I found this pattern:

fill-in-patterns

ABBB

Then I checked near the end of the old 3 sibling pattern which is at ID 19806.

break-point

At ID 19827 we see an ABAB Pattern, so I enter that Pattern in my spreadsheet:

newpattern4

For the start of the new ABAB pattern, I used the old ABA location as that was more precise. The next interesting thing happens at Chromosome 2:

chr2

Here I have a problem in my spreadsheet. For some reason, the Start of the last pattern of Chromosome 2 ends at Chromsome 3, which is not right. My previous spreadsheet was better than that. From the ashes I will re-build.

I note that at ID 108798, my 4 Sib Spreadsheet goes to an ABAB Pattern. At the end of Chromosome 2, I see an AAAB Pattern. That was the one I wouldn’t have had from the 3 sibling pattern as I wasn’t checking on AAA’s.

I added new rows for the patterns ABAB and AAAB:

addnewrows

The most important thing here is the ID, the pattern, the Start and Stop. Here is the new change area from ABAB to AAAB:

chr2change

There are a few SNPs between the ABAB Stop and the AAAB Start that are a little unclear.

end-of-2

Finding Jon’s Patterns

Now I’ll check Jon’s Patterns. I’m looking for any changes in patterns as these should be important as crossovers later. I will need to assign the crossovers to each sibling’s Chromosome Map.

Good Old Triple A – B Pattern and all the others

AAAB is where Jon has a different paternal grandparent than his 3 tested siblings and the 3 siblings have the same paternal grandparent.

aaabquery

My query says that Jon has to be different from each sibling. I run that and insert the appropriate Start and Stop point for the AAAB in my spreadsheet.

I do the same for AABA which I can find using a similar query under Heidi’s criteria:

aaba-query

I ended up going to a clean spreadsheet. It was too messy combining the 4 sibling results with the old 3 sibling results.

4sibpatterns

Here I have the ID, the Chromosome, the pattern and the Start and Stop. The yellow marks a one SNP pattern. It appears that there should be 3 types of patterns:

  1. One where one sibling matches none of the others. That is what I have above: AAAB, ABAA, AABA and BAAA
  2. One where 2 pairs of siblings match each other: AABB or ABBA. I’m not sure what else there could be. I looked above and saw one other: ABAB
  3. One where all the siblings match each other: AAAA

That makes 7 or 8 patterns, depending on whether AAAA is considered a pattern.

Two Pairs of siblings match each other patterns

Here is the Access query for AABB

aabb-query

At first I was missing the criteria under SharonFromDad and that gave me AAAA combinations also. The result of the query looks like this:

aabb-results

Here Joel matches Sharon and Heidi matches Jon but on a different base. After I was finished putting in Starts and Stops for each Pattern, I then sorted my spreadsheet by ID. This brings up some issues that need looking at:

quality-control

Where there are 2 Starts or Stops in a row, there is a need to check what is going on. The ones around the yellow positions may not be a problem as I’ll likely be taking those single positions out. However, at the end of Chromosome, there are 2 starts and 2 stops together. I need to go to ID 236707 and see what is before that point. It apears that there is an AAAA pattern before that point and that the ABAB at 224584 is a single point. That fixes half of the problem. Then I go to ID 238976 to see why I have a Stop there for ABAB.

fix5

I had missed the Start for the ABAB right after the stop of the ABBA pattern, so I added it in. The repaired spreadsheet looks like this.

fix5spreadsheet

An application

Now that I have the change between ABBB and ABAB described, let’s look at what it means. Here is a different look at that location:

heidi-break

When the pattern changes from ABBB to ABAB, what has changed is the third B changes to an A. Heidi is in that location. So that says at the above position of Chromosome 5, Heidi has a paternal crossover. I thought it would be good to check my work against the work of M MacNeill. To do that, I used the NCBI Remap website to change my Build 37 results to Build 36:

remap

This would be the start of Heidi’s new segment. Here is what MacNeill had:

macneill-check

I got it right again. That is 2 for 2. Actually, the first time I tried, I was comparing the wrong Chromosomes. Rookie mistake. Here is M MacNeill’s map for Heidi on Chromosome 5:

macneill5

Perhaps it is difficult to see, but the point I am looking at is the little lighter red segment at the far right of Chromosome 5. Perhaps that is why I missed it the first time as it is so small.

Another Aside is that this was a very difficult Chromosome to decipher using visual methods. This was one of my attempts to figure out the crossovers visually for 3 siblings.

visual-chr5

I had missed the last crossover as it is so small and difficult to see. In my defense, I should note that M MacNeill did mention that the end of this Chromosome was difficult to decipher.

Taking Out the X

I’ve realized that I’ve generated some bases for the X I got from Dad. Of course, I didn’t really, so I’m taking out any bases there for me and my brother Jon. I’ll use this update query:

takeoutx

I was worried that I’d mess something up, so I created  a  new table called 4SibsChrX. My query put dashes in the spots where I couldn’t have an X base from Dad:

xtodash

This looks like a good place to end Part 4. It appears that there should be many chances to quality check my work and that the process is progressing. Getting Jon’s new DNA set me back a bit, but the results should be better than what I’d see with 3 siblings.


Raw Data Phasing: Part 3

This Blog is Part 3 documenting my learning process of phasing my DNA raw data using:

Part 1 and 2 Recap

  1. I imported 4 sets of raw data into Access from AncestryDNA after taking out the zeros that the Excel software produced for the no-calls.
  2. I used Access Queries to apply 3 Whit Athey Principles. This resulted in many phased bases for me and my 2 sisters.
  3. I put the phased A’s, G’s, C’s and T’s for each siblings into 2 new columns for each sibling
  4. This resulted in 6 new columns. The first 3 of these six were for the paternally based bases. These resulted in a pattern which was either in the form of AAB, ABA, or ABB.
  5. The Athey Paper did not emphasize the AAA pattern or considered it a non-pattern. While specific AAA results within another pattern area are by chance, there are other areas where 3 siblings match the same grandparent where there will be an AAA-only Pattern.
  6. I separated my results into 3 patterns using Access: AAB, ABA, and ABB
  7. For each of those results, I noted where those patterns changed.  I did this by looking at the ID numbers. Breaks in the ID numbers were considered changes.
  8. However, there were some cases where the changes occurred around missing bases. For these, I went back and noted a more precise position of the pattern change based on where the change would be if the missing base were to be filled in.
  9. I Made a preliminary bar graph using the first 3 paternal changes. These crossovers were mapped to myself and 2 sisters.
  10. Using the 3 patterns I developed Access queries to fill in the missing bases in the 3 paternal pattern areas.

So those were the 10 easy steps. Actually step 10 was difficult as there was quite a bit of refining the Access queries and quality checking the results. I needed 2 queries for each of the pattern areas. However, once I had the queries, it was the push of a button to update missing parental-received bases for 3 siblings within over 700,000 lines of DNA.

Back to Athey

This portion of the Athey Paper appears to apply to where I am now:

For some of the unfilled cells on the mother’s side of the table, we can fill in the alternative (other) base from the corresponding location on the father’s side of the table. That is, we know that the sibling with an empty cell got one base from the father, but the alternative base from the mother. Therefore, after the use of the Dad pattern fills in more cells, a newly filled – in cell in the father’s side of the table gives rise to a filled – in cell in the same position on the mother’s side–the alternative base to what was on the father’s side.

Unfortunately, I’m not sure what is meant above. My guess is that this relates to Principle 3:

Principle 3 — A final phasing principle is almost trivial, but it is normally not useful because there is usually no way to satisfy its conditions: If a child is heterozygous at a particular SNP, and if it is possible to determine which parent contributed one of the bases, then the other parent necessarily contributed the other (or alternate) base. This principle will be very useful in the present approach.

So now that missing paternal bases have been determined based on the patterns, it should be possible to fill in missing maternal bases for heterozygous children. First, I’ll do a Query to see if I can locate this situation. I’ll take my most recently updated Dad ABB Pattern Table update and query that. I’ll look at the situation where there are heterozygous results. Then, I’ll look at spots where there are missing bases from Mom.

Fortunately, I was able to come up with a slick looking Query for this situation:

mom-from-dad

Plus the Query design has some nice symmetry. The first criteria row of the query is for my (Joel) DNA. Reading across, it says Joel is heterozygous because my allele 1 does not equal my allele 2. Then it says that I have a base from Dad but not from Mom. This will show areas where the mom bases are missing in this heterozygous child situation.

mom-bases-to-fill-in

The truncated fields above are Joel Allele 1, Joel Allele 2, Sharon allele 1&2, Heidi allele 1&2. The next 3 columns are Joel, Sharon and Heidi from Dad. Then Joel, Sharon and Heidi from Mom (the last 3 columns). This shows that there are almost 12,000 of these Mom bases to fill in. Above the blue line are Heidi’s bases missing from Mom. Heidi is TC (heterozygous) on that line. Her Dad base is T. I love these binary problems. They seem well suited for the computer. That means that a query could not be too difficult to update almost 12,000 records. So Heidi’s Mom base will be C above the blue line. At the blue highlighted area, I am TC and my Dad base is C. My Mom base will be T on the blue line.

Looking for a Good Query to Fill In Mom Bases from Dad Bases

First, I copied my ABB Table to a new Table called tbleMomBaseFromDadBase. I will want to update that table with a new Update Query. I already have the first part of the query. Now I need my thinking cap. Even better than thinking, I can look at what I did before. Here is my old query.

allele1-query-heterozygous

This is difficult to see, but I split the problem into 2 alleles. What this says is when Sharon has a base from her mom and Sharon’s allele 1 is not the same as the base from her Mom, pop that allele 1 into her base from Dad slot.

For our situation we are doing the opposite. So we will switch Mom and Dad. This time we are using our Dad results to get some Mom results. I’ll also add a criteria to make sure the Mom result is Null, so I’m not overwriting anything. It will just be an extra precaution.

Basically, I want to make sure Heidi has a base from Dad and not from Mom. In that case, when her allele1 is not equal to her base from Dad, put that allele 1 in as her base from Mom. Drawing upon my vast experience in this area of about 1 week, I get this:

allele1dad-to-mom

When I preview the results, I get about 6,000 lines which is half of my previous query, so that seems OK. I’ll go ahead and update my new Table. I renamed my Query to qryMomBaseFromDadBaseAllele1 and copied it to do the same thing with Allele2. I’ll change the Allele’s 1’s to Allele’s 2 in the Query design. First I’ll do a Select (non-updating) Query to show what I’ll be updating with the allele’s 2.

allele2momfromdadselectquery

Here I added the ID numbers, so I can make sure my update went well.

Here is my Allele2 Update Query with the 3 siblings included:

allele2momfromdadupdatequery

The results:

momfromdadupdate

In the far right column is the Base Heidi got from Mom. It was updated on lines 2292, 2295 and 2299. In each case Heidi’s Paternal Base was T and the Maternally derived Base from Dad was C.

Here is my corresponding filled in Mom Base:

joelmomfromdad

My Dad’s T’s in 6 columns from the right were used to fill in the missing C’s in 3 columns from the right. Doesn’t it seem a bit ironic? Even though my dad was not tested for DNA, his “results” from this process are used to find the DNA I got from my mom who was tested.

A Premature End to This Blog and a New Beginning

This will be one of my shortest Blogs. I was both awaiting and not awaiting my brother’s DNA test results. Those results came in this week. The reason I was not awaiting was that I knew that I would need to re-start the raw data DNA phasing process once his results came in. With that, I’ll end this Blog and start a new one.


Raw Data Phasing Via Access, Athey and MacNeill: Part 2

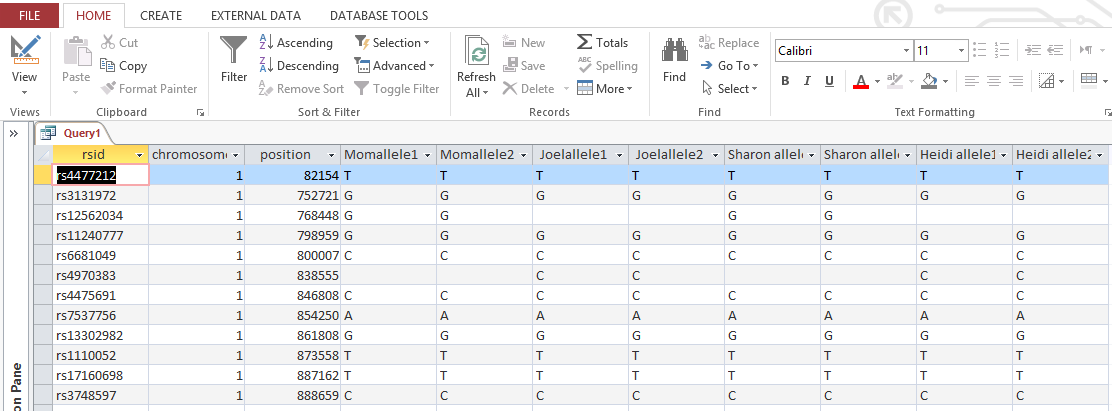
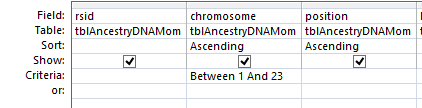
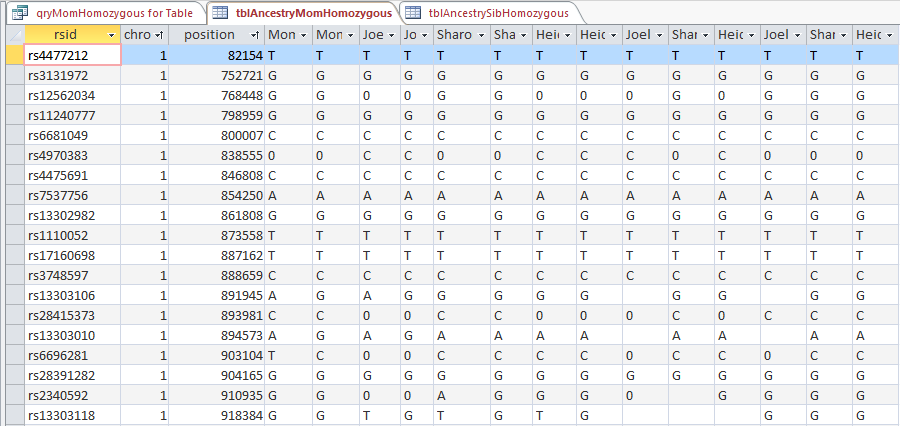
In my last Blog on raw data phasing, I went through 3 principals that Whit Athey laid out in a paper on phasing raw data when one parent’s DNA results were missing. Using those principals, and the MS Access program, I was able to sort many of my bases and 2 sisters’ bases into ones we received from our mom and ones that we received from our dad. I checked a few of my results with a chromosome map made for me by M Macneill.

Paternal Patterns

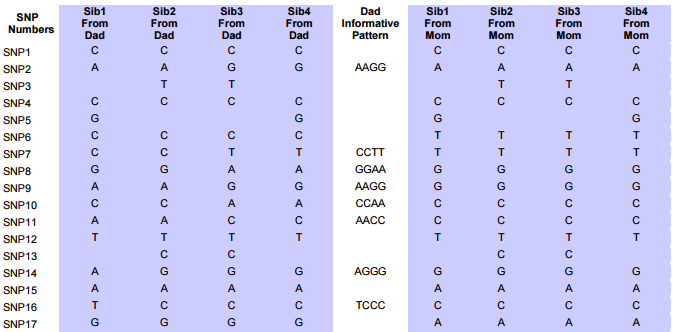
I had gotten to the part of the Athey paper where he talks about paternal patterns of bases that the sibling combinations received. I noted a space between the first two paternal patterns that I looked at. Below the pattern goes from an ABA pattern to an ABB pattern.

change-in-dad-pattern-hilite

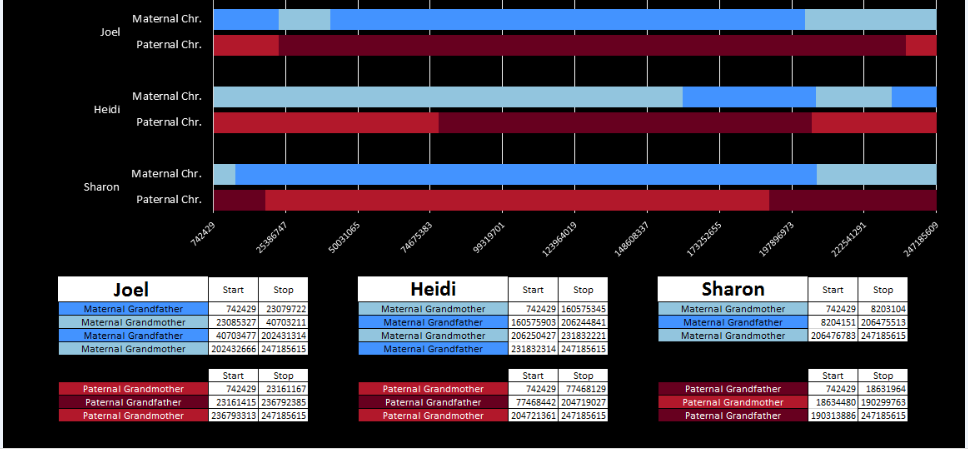
There was a gap between the ABA and ABB pattern where there was no ‘pattern’ as my 2 sisters and I shared the same base there. When my sisters and I all share the same base, that is an AAA “pattern”. That AAA area corresponded exactly to the area between the 2 yellow lines below in the chromosome map made for me by M MacNeill – prairielad_genealogy@hotmail.com .

macneill-chr1-hilite

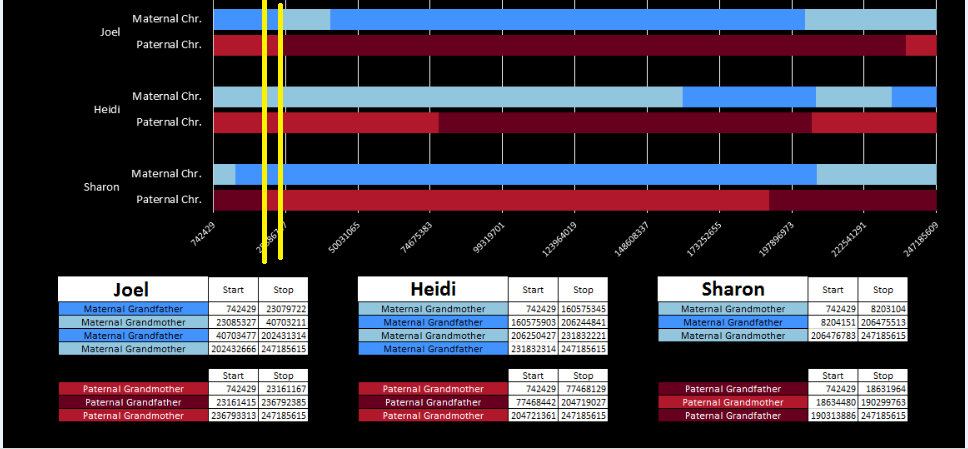
In the map above, MacNeill was able to determine that my 2 sisters and I got our DNA from our paternal grandmother in the area between the 2 yellow lines. Further, the first yellow line described Sharon’s first paternal crossover point and the second yellow line described my (Joel’s) first paternal crossover point.

Finding All the Paternal Crossover Points

At this point in the Athey Paper, he recommended looking at the paternal pattern and filling in the missing bases based on the known pattern. I was looking for an easier way to do this, so decided to take a different approach. I decided that I would find all the paternal crossover points first. Then, armed with that information, I would create a formula that would fill in most or all of the missing bases for each pattern.

However, this required a modification of my database to make the work easier. I wanted a number to define the range of patterns, so that I could apply an easy query to add missing bases. I already had this but I hadn’t used it. Back when I imported the 4 sets of raw data into Access, Access assigned an ID to every row of data. That meant that I needed to add that ID into all the queries that I had done previously to make tables and further queries. This took a while, but I believe that it was worth it.

table-with-id

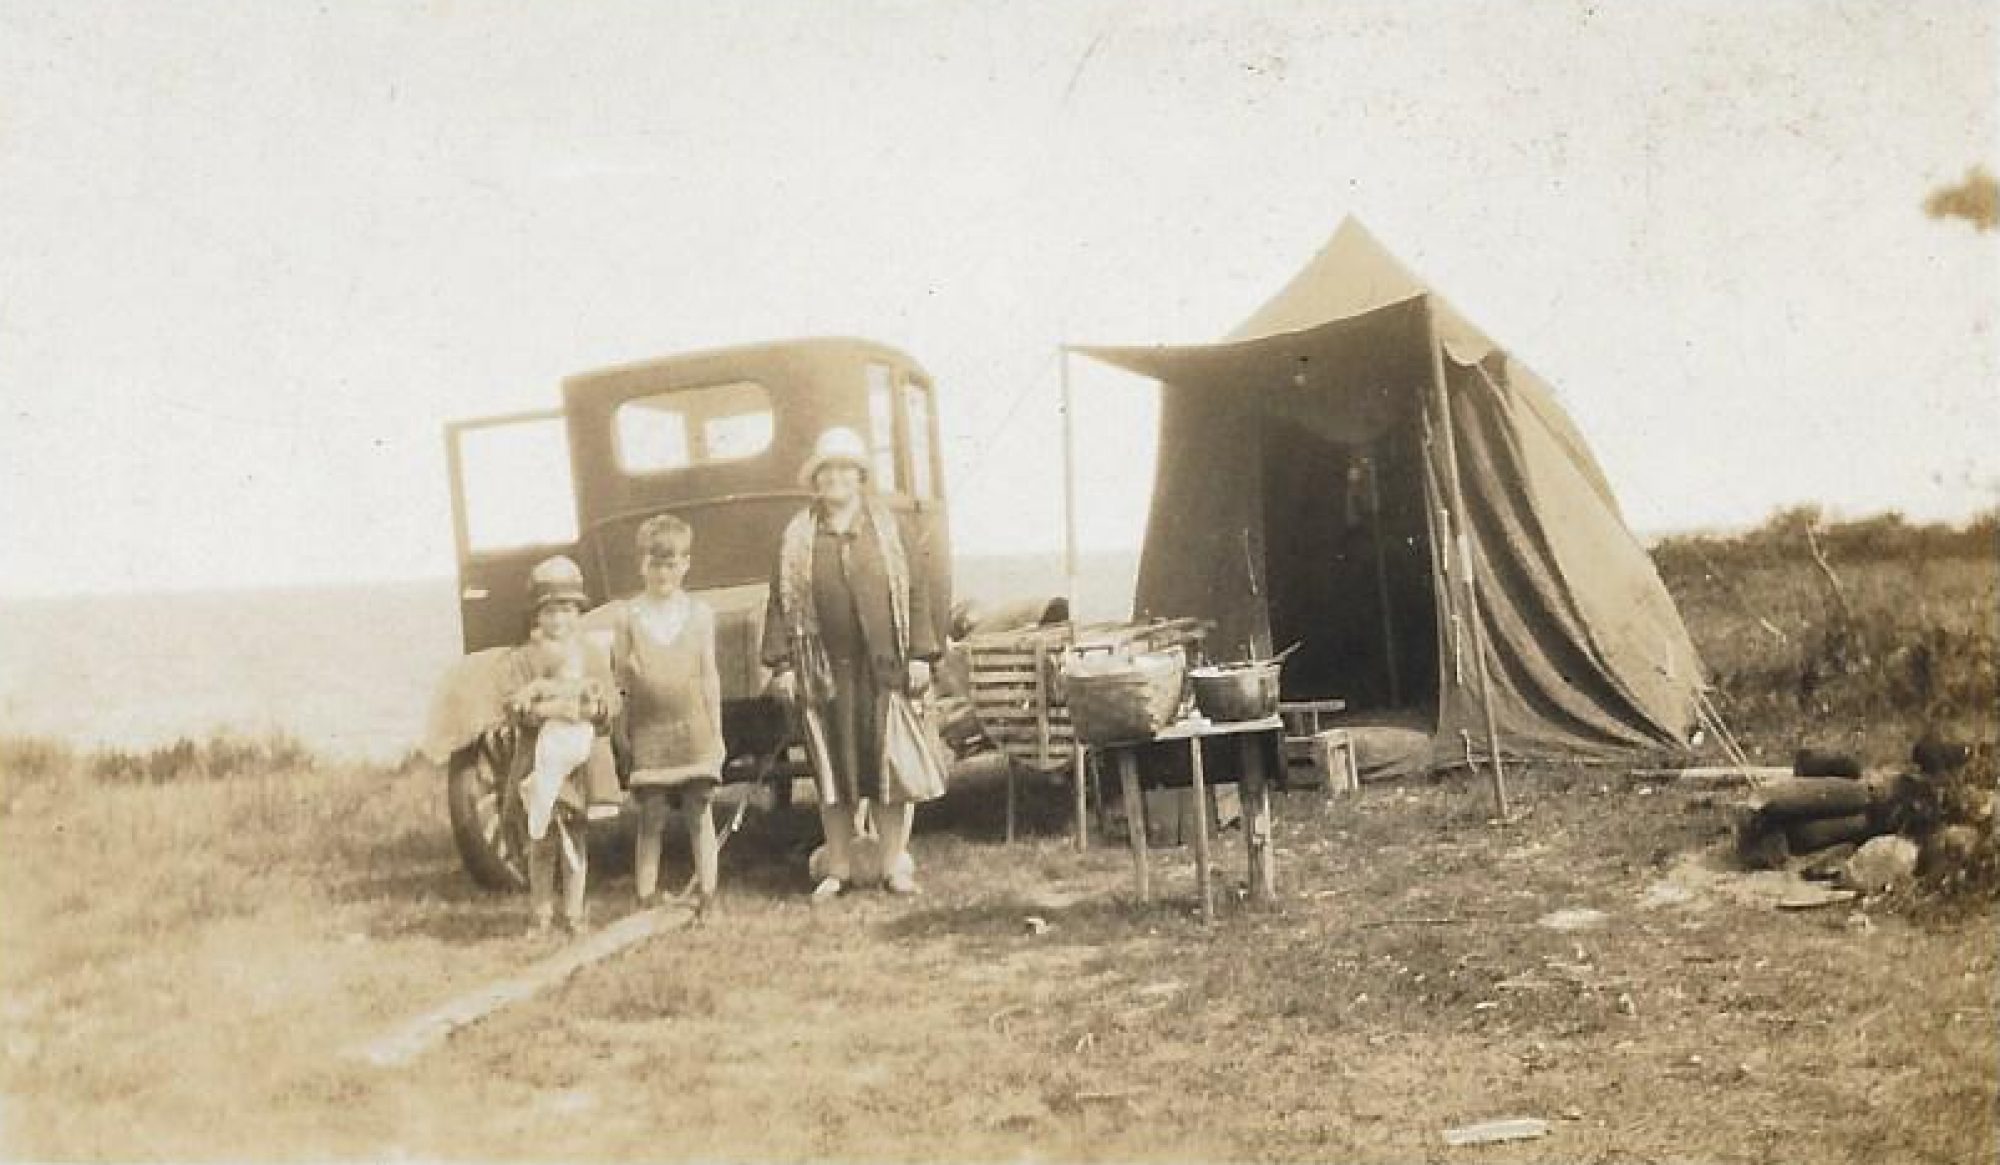
The ID is the first column.

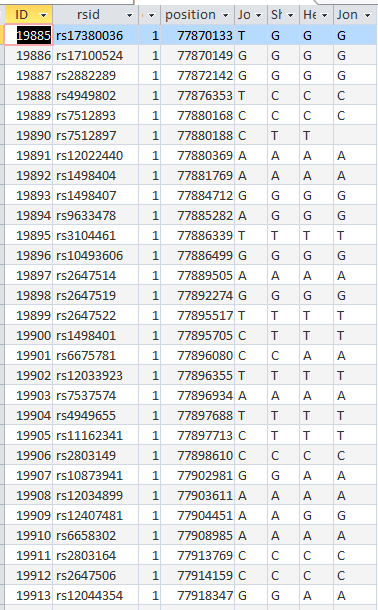
I started going down all my data and noting the change of each pattern. I put the results into an Excel table. Here the Start and Stop numbers are the Access assigned ID numbers. The ID’s corrrespond with the number of DNA locations looked at. In this case there were a bit over a total of 700,000 of these locations for my mom, my 2 sisters, and me.

excel-pattern

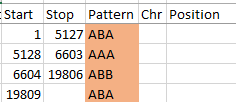
Then I noted the patterns are repeating as would be expected. For example, my first pattern was ABA, but 3 patterns later, that same ABA repeated. My thought was to create a query just for ABA patterns. Then when scrolling down looking for changes, the separation between rows should be greater and it would be easier to see where those changes were.

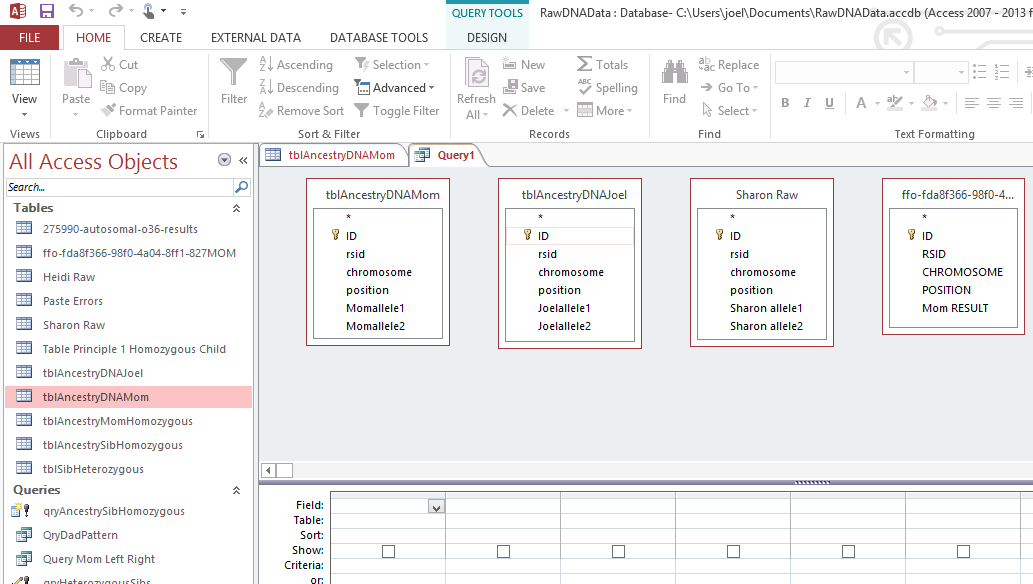
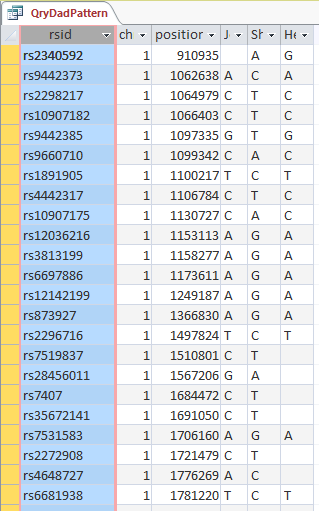
Here is what my Access query looks like. I changed the query name to DadSpecificPattern.

dad-specific-pattern-queryquery

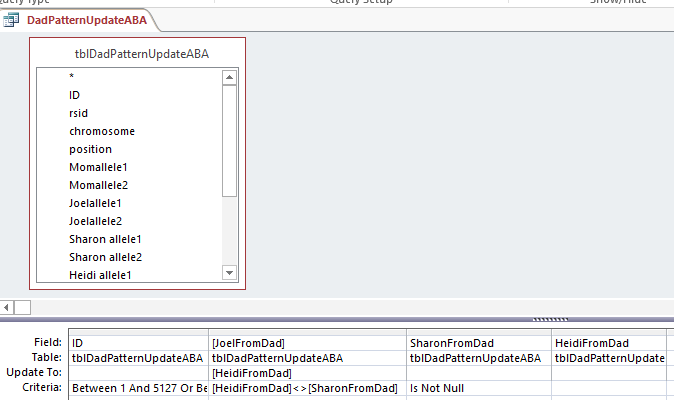
This particular query gives me the ABB pattern. I have the HeidifromDad base equal to the SharonFromDad base. That makes me the A and Sharon and Heidi the BB of the ABB Pattern. If you think about it, that also means in these areas that Heidi and Sharon will have their base from the same paternal grandparent and mine will be from the other paternal grandparent. I’m learning as I go. I’m sure that information will come in handy later.

My plan seemed to be good, but there was one catch. Once I refined my query, most or all of the blanks disappeared. That meant that the start and end points might not be exact. Here is an example of what I mean.

change-in-pattern-rouch

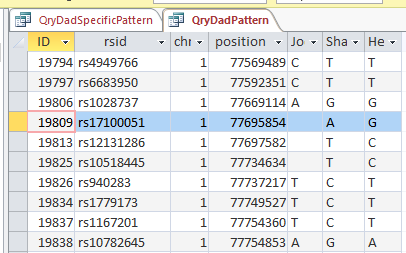
This is from my old Dad Pattern query with the blanks still there. The change from ABB to ABA happens at ID or line 19809. However, the new query takes out the blanks to make it look like the change is at ID Line 19826.

Here is what my DNA results look like so far without a filter (or query). The last 3 columns are the bases from Dad columns. There is a lot going on between lines 19809 and 19826.

pattern-unfiltered

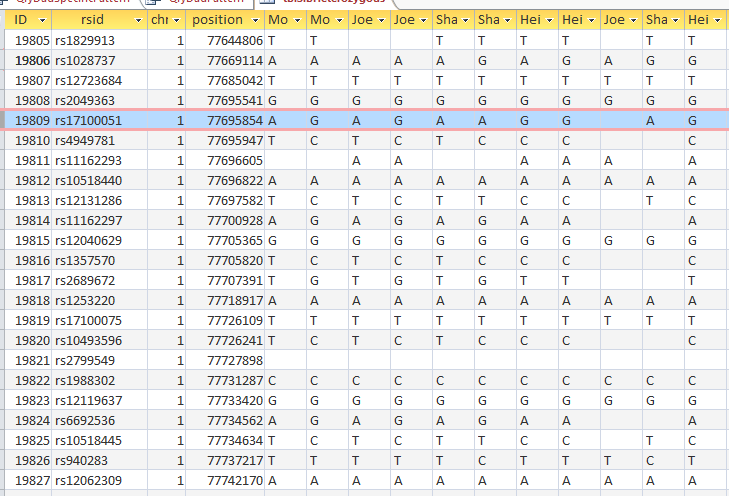
Once I apply a formula to add bases, it will say something like: In the lines that have the ABA pattern where there is a blank at either A spot, replace the blank with the A that is there. If I apply the rule too late, I will be missing an area. Worse, If I were to use the 19826 cutoff, I may be still using the previous rule. That rule would say basically the same thing except, “Where the row is ABB and one of the B’s is missing replace the missing B with the one that is there.” If I apply an ABB rule to an ABA area, I’ll get bad results.

Long story short, I ended up recording a rough start and stop in my Excel Spreadsheet.

revised-spreadsheet-for-pattern

I started naming the segments, but realized that was not necessary. Some of the patterns were only at one point rather than in a long segment. I believe that is an anomaly due to a bad read, mutation or some other problem. Those are the ones in the spreadsheet that had no end point. It took me part of a morning to get all the paternal crossover pattern points for all 23 chromosomes. Fortunately for 3 siblings, the patterns are only ABA, AAB and ABB.

I just went back and checked the error points/aonomalies. I reran the Heterozygous Sibling Query and it fixed at least the first problem and hopefully the others. When I added the ID’s in, I had to redo all the queries quickly, so I suppose that is where the errors came in. That is not a problem as long as the problem can be found a fix can usually also be found. There actually weren’t that many errors. There are still some anomalies that are just anomalies. I have left those in yellow in the spreadsheet image below.

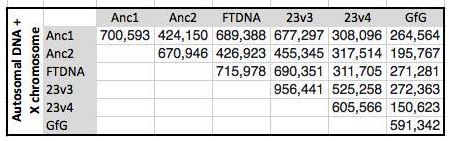
So in my spreadsheet, I have all the rough starts and ends for all the crossovers for my 2 sisters and myself. Here is the top part of the spreadsheet sorted by rough start:

rough-start-sort

Next, all I need are more exact start and end points. Here is the start of what I have:

pos-and-id-and-pattern

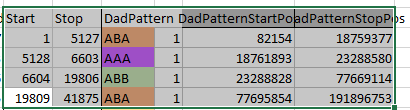
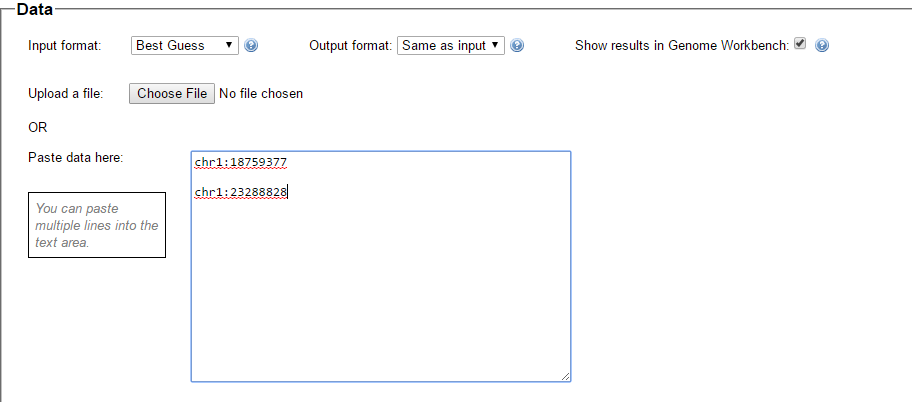
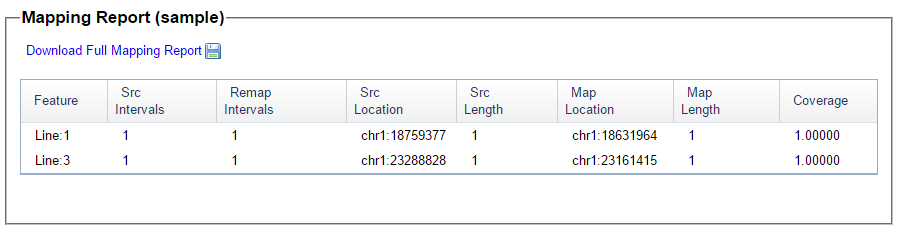
I picked this section because it looks pretty complete already. Note that my Start and Stop numbers are pretty close to each other. That means that there are no other AAA segments in-between. I had to do an additional Access query to add in the position numbers for the Start and Stop of each chromosome’s pattern change. This was important if I want to convert the results from Build 37 to Build 36 to compare to MacNeill’s work or to gedmatch.com.

Starting to Find Paternal Crossovers and Assigning to Siblings

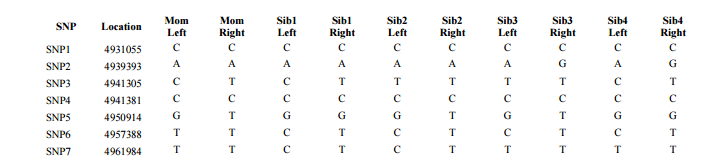
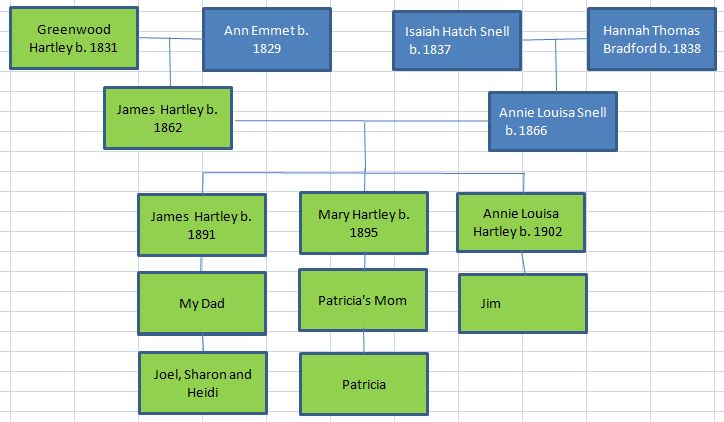
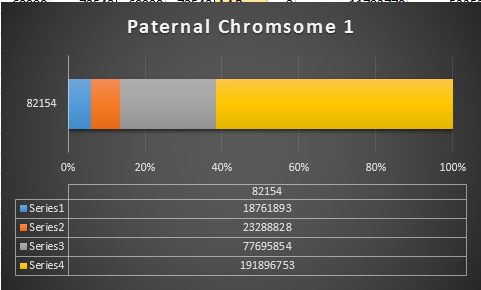
Previously I had been calling the start and end of my patterns crossovers. These two terms aren’t totally interchangeable as the start or stop of a pattern may happen at the beginning or end of a Chromosome and therefor not be a crossover at that point. It seems like it should be pretty easy to find the crossovers. Look at the image above. The first and second rows show ABA going to AAA. The order in me and my siblings are JSH or Joel, Sharon and Heidi. The only letter that changes is the B to A. That is the position that Sharon is in, so the paternal crossover has to go to her. From row 2 to row 3 the pattern changes from AAA to ABB at Chromosome 1, position 23,288,828, Build 37. That doesn’t mean that 2 siblings have a crossover there as we are looking at the patterns, not the letters. It is actually the letter that stayed the same that represents the crossover here. AAA to ABB means: all the same (AAA) goes to one different and 2 the same (ABB) – in this case Sharon and Heidi). The one that is different is me and I get the crossover at this location. The next change is from ABB to ABA. This is a little harder to see. I would say that that this crossover goes to Heidi if my reasoning is right. BB was the same before and goes to BA. It must be Heidi that changed because now she matches Joel who didn’t change. I’ll need to figure out how to make better bar graphs in Excel, but here is how the beginning part my father’s Chromosome 1 broke up for 3 of his children. Or another way to look at it the vertical lines are where my father’s maternal and paternal chromosomes combined in each of his 3 children that we are now looking at.

excel-bar-chart-chr1

Where:

  • Series 1 is Sharon. Where the color goes from blue to orange is where Sharon has a change from one paternal grandparent’s DNA to another paternal grandparent’s DNA. The number to the right of Series 1 is the Build 37 Chromosome position number for Sharon’s crossover.
  • Series 2 is Joel’s first crossover (between orange and gray) and
  • Series 3 is Heidi’s first crossover position between gray and yellow [The same explanation under Sharon above applies to Joel and Heidi]

I’ll go back to the M MacNeill Standard. It’s like having an answer sheet to my questions.

macneill-chr1-hilite

According to MacNeill, I have assigned the crossovers to the correct siblings. In the above chart, just look at the red. I haven’t gotten to the maternal part yet, which MacNeill has in blue. The first 3 crossovers are where the red changes from light to dark or dark to light red. The difference in the MacNeill Chart is that his chart is split out one bar for each sibling. The other difference is that MacNeill has build 36 Chromosome position numbers and the numbers I have are from Build 37.

The Process

  1. Phase the siblings into maternal and paternal DNA using the principles that Athey outlines
  2. Find the paternal and maternal crossovers by pattern changes
  3. Assign the crossovers to the correct sibling using the pattern changes
  4. Assign the segments to the correct grandparent. This requires knowledge of cousin matches on the appropriate grandparent side.

That is the big picture which I am understanding as long as I don’t get too lost in the details.

Back to the Details: Fill in More A’s, G’s, C’s and T’s

I have been setting up my data for this, so hopefully, this will be easy. I now have 3 areas to look at:

  • AAB
  • ABA
  • ABB
AAB paternal update

Now I go back to my spreadsheet and sort it by Dad Pattern:

sort-by-pattern

The Start and Stop areas are the ones I want to update. First, I’ll copy my most up to date Table in Access which is tblSibHetorzygous. I’ll rename that tblDadPatternUpdate. Then I want to look for missing data and update the blanks using the AAB pattern.

In Access, I create a query with the new table.

dad-pattern-update-1

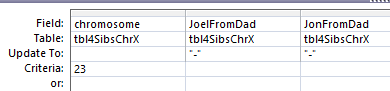
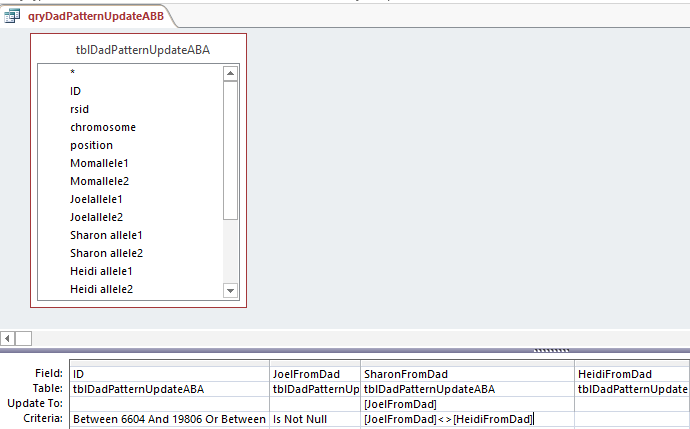
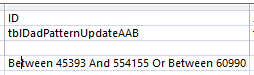
I chose the position fields and Paternal Pattern fields. I will change this to an update query which adds an Update To row. The criteria I want is when JoelFromDad = Sharon from Dad (AAB). Actually, I forgot, I was going to use ID criteria. So in the ID field, I need a lot of information. For the first AAB segment, I need everything between ID 45393 and 54155. This is what the criteria looks like:

aab-first-area

When I choose that area, I get over 8,000 lines. However, I only want to update when there is one missing value in the first 2 and the one that isn’t missing is not equal to the third. Here is the result of the above query in my first AAB area:

aab-patterns

I assume that the first blank should be a T. This would be one of the AAA results by chance in an AAB area. I don’t want to fill in the second line as I don’t know if it will be GGG or something else. That is what I meant by saying I don’t want to fill anything in unless there is only one missing value. In the 5th line there is A?G. That would have to be AAG (in an AAB Pattern area). There are some lines that have everything missing that I don’t want to touch.

How to create a query?

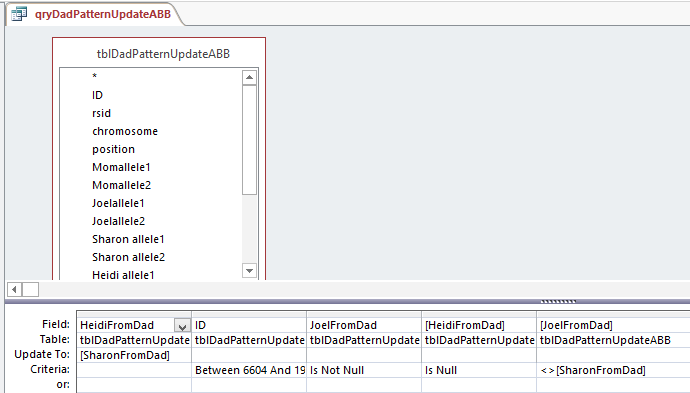
First, I want the situation where Joel doesn’t equal Sharon or Joel Doesn’t equal Sharon. That would create an AAB situation:

heid-not-joel-or-sharon

This query results in 1,666 rows of data including rows that are already filled in. Note that I had to write the range of ID’s twice because in order to get an OR situation I needed to put Joel not equat to Heidi and Sharon not equal to Heidi on separate lines. A simpler query is this one:

heidi-not-joel-or-sharon-one-line

The above achieves the same results in one line. Now, for this query, if Joel is blank, replace it with Sharon’s results. If Sharon is blank, replace it with Joel’s results. Here is the query prior to the updating part:

joel-sharon-blanks

This shows that there are 29 blanks for Joel and Sharon meeting this AAB criteria in the first range of AAB’s:

29-records-aab

Next, I apply the same logic to all the AAB segments. In the Expression Builder of Access, I type in this simple formula:

Between 45393 And 54155 Or Between 60990 And 72548 Or Between 207109 And 220679 Or Between 313271 And 317516 OR Between 326845 And 326912 OR Between 389395 And 390311 OR Between 400045 And 405578 OR Between 419982 and 427158 OR Between 433191 And 446672
OR Between 482297 And 492542 OR Between 532520 And 539292 OR Between 571557 And 579594 OR Between 589614 And 589666 OR Between 630037 And 630314 OR Between 630319 And 630378 OR Between 658744 And 659375 OR Between 670533 And 672360 OR Between 673325 And 682544

Simple but long. This has the AAB Starts and Stops for 23 chromosomes. Then I copy it into the next ID criteria line and get this result:

all-missing-aabs

It took a few minutes to type the criteria, but the goal is to update 1,514 lines of missing Paterrnal Pattern data with the push of one button. I still think it is quicker than going line by line and will be more accurate if I got the criteria right.

Next, I change the above Select Query to an Update Query.

paternal-aab-update-query

When my (Joel’s) base from Dad is missing, I update to Sharon’s base. When Sharon’s base from Dad is missing her base is updated with mine. Isn’t sharing great? I didn’t look at the case where Heidi’s base from dad was missing, because if that was missing we wouldn’t be able to see any AAB Pattern.

Let’s UPdate

I push the run button and check the results. Here is my standard dire warning:

standard-dire-warning

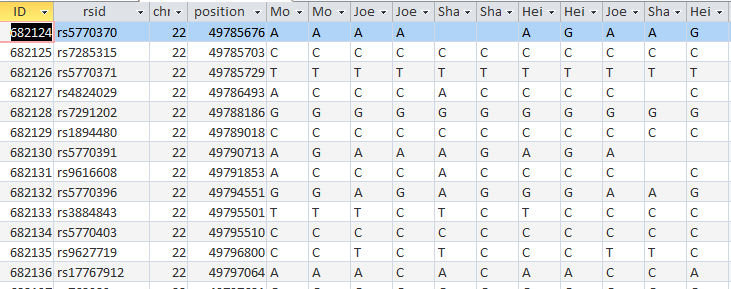
Now I will check if it worked. I’ll try ID or Line # 682124:

bad-aab-results

Unfortunately, that was an undesirable result. Before I had A?G. I changed this to ?AG. It appears that my query both replaced my value with Sharon’s, but replaced Sharon’s with my blank. I hadn’t expected that. Next, I’ll check ID# 682182. I had ?AG and replaced it with A?G. So until, I can think of a solution, I’ll need to split the 2 queries.

Fix it! Quick!

First I recopied by Heterozygous Sibling Table back to the Dad Pattern Update 1 Table. This got the table back to the way it was. Here is my simpler query.

dad-aab-simpler-query

Here if my base from Dad is null, replace it with Sharon’s base from Dad. I’ll check ID# 682182 again:

second-mistake

This gets into the category of trial and error. Sharon’s result still got replaced with nothing. See in the previous query I still was telling Access to put update Sharon’s results with mine. I needed to take that out:

fix

There. Now the SharonFromDad Update To is blank. I go through the same procedures and now it looks right.

right-results

We now went from ?AG to AAG in the last 3 columns. These are the bases from Dad columns.

The next step is pretty easy:

sharon-missing-aab

I took out my criteria and put criteria in the SharonFromDad field. When she has a blank, replace it with Joel’s base from Dad. I hit run and it updated over 600 rows. Here is my original check spot at ID# 682124 with better results in the last 3 columns:

better-results

It took a while, but at least I got it right. The moral of the story is to not ask Access to do 2 things at once when those 2 things involve the same 2 people.

The Next Step: ABA

This time I’ll try a different query. I want there to be a B from the ABA in each case, so I’ll make sure that Sharon’s base from Dad is there:

aba-query

Maybe I’ll figure what went wrong last time or come up with a new error. Above, I want the criteria on the first line to be for my blank base: If Sharon’s base from Dad is not equal to Heidi’s Base from Dad Put Heidi’s base from Dad in my blank spot. For Heidi, When Joel’s base from Dad doesn’t equal Sharon’s base from Dad, put Joel’s Base in Heidi’s spot.

I’m so tempted to try this query, but before I do, I’ll copy the previous table of the DadPatternUpdate to a new Dad Pattern Update ABA Table.  This will preserve what I have in the now older DadPatternUpdate Table in case anything goes wrong. Hey, what could go wrong?

query-aba-dad

I pushed the Update Button and updated over 30,000 rows. The results don’t appear to be any better, so I’m back to my 2 step process.

Here is my new slimmed down query:

slimmed-down-query

This new Update Query should update my Line 18 in the new UpdateABA Dad Pattern Table and it does:

lne-18

I now have a full ABA pattern on that line. According to Access over 30,000 Lines were updated, so it wasn’t a total waste of time.

heidi-aba

Run and check Line 149:

check-149

We have ABA in the last 3 columns, so that is good. Line 18 is still OK. I checked it just to make sure.

Query AAB Revised

After seeing how well the ABA Query went, I decided to revise the old AAB Query:

aab-query-rev

This is now looking at over 37,000 rows. This updates my AAB Blanks to tblDadPatternAAB. I don’t know if it is a better query, but at least I’m being consistent.

sharon-missing-aab-rev

This was over 80,000 rows, so I’ll assume that bigger is better.

I copied that resulting Table to tblDadPatternUpdateABA and reran the 2 ABA Update Queries. Here is one of the rerun queries updating the ABA Paternal Table:

rerun-aba

Down to ABB

My Last updated Paternal Table was updating ABA, so I’ll copy that to a new Table called tblDadPatternUpdateABB. I’ll also copy my last query and put in the appropriate Starts and Stops for the paternal ABB patterns. Again,

abb1

This says when Joel’s base from dad is not the same as Heidi, put that Joel from Dad into the space. Probably a more precise query would have said when Sharon from Dad is null and Joel from Dad is not equal to Heidi from Dad. I suppose technically the above query could be writing over a base with the same base in most cases.

I’ll fix that and notice that I had the wrong table in the top, so I’ll change that also.

abb-rev

This only updated 944 rows, so maybe bigger is not better. Here is Part 2:

abb2

This was almost 3,000 rows updated. Now I should check if it worked. I scrolled for an ABB Pattern in an old query and found this:

dad-pattern-abb

Here is my check:

abb-check

I guess I’ve been working too long. Here I have an AAB instead of the ABB I wanted. That is because I had Heidi updated to me (the A) instead of Sharon (the B). Here is the correction:

abb-corrections

I made a fresh Table of ABB. When I opened up the Query, it was saved this way:

corrected-abb

So Access changed my query. Note that there are 2 fields with HeidiFromDad in them. One is for the Update To and the other has Criteria. That is probably a clearer way to do it. Who should argue with Access?

I updated that and I take a cue from Access for Part 2:

access-abb-part-2

In English, the above says, “For this range when JoelFromDad is not blank but Sharon from Dad is, and Joel from Dad has a different value that Heidi from Dad, put that Heidi from Dad value where Sharon had the blank. It sounds a little complicated.

Back to Row 197704 and I’ll look at 197709 while I’m at it:

corrected-abb-pattern

Oh no, it is still wrong! I checked the previous ABA Table and that was the reason for the error. The error is also in the old AAB Table. However, the error was not in the file before that. My guess is that the AAB rule got applied to the wrong range of rows. I don’t see an error there, so I’ll have to rerun all the queries.

That’s OK, because I’m brushing up on the queries and will use the Is Null value so we will only be filling in the missing bases.

rev-aab-query

I had more problems, so I deleted the AAB Table and recopied the previous Table into it. I reran the Revised AAB Query halfway and it looked OK. However, when I ran the second half of the AAB query – filling Sharon’s results, the problem came back at ID# 197704. Very mysterious. The problem was where I thought it was originally. Look at the ID Criteria for the AAB Pattern Query:

the-problem

There is an extra digit in the first between. The range goes from 45393 to 544155. The second number should be 54155. So this query was performed on 450,000 more rows than intended. I updated the AAB query with fewer rows. Again fewer is better. After many requeryings, I got the desired result for ID# 197704:

197704

That should be the end of the first phase of nit picky work on the Paternal Side.

Summary, Conclusion and What’s Next

  • This was a lot of work, but the good news is that this update is for all the Chromosomes at once.
  • The bad news is that I have to do this again for the Maternal Side
  • Next up should be easy. That is just re-applying the Principles that Whit Athey Outlined on the new bases that I added from knowing the patterns. This should update missing maternally received bases from the updated paternally received bases.
  • I haven’t filled in blanks for the AAA patterns yet.
  • I am a little ahead of the game as I looked at how some of the first paternal crossovers will look.
  • Also with some basic phasing, I was able to deduce who those first paternal crossovers belonged to – one each to my two sisters and one for me.
  • If anything can go wrong it will

Phasing Raw DNA with MS Access a la Whit Athey: Part 1

In this Blog, I would like to look at my raw DNA data. Those are the A’s, T’s, G’s and C’s. I have tested at AncestryDNA as has my mom and 2 sisters, so I will use those results. Whit Athey has a paper that describes how to phase your DNA when the DNA from one parent is missing:

Journal of Genetic Genealogy, 6(1), 2010
Journal of Genetic Genealogy
Fall 2010, Vol. 6, Number 1
T. Whit Athey
Many have used MS Excel to phase their raw DNA results. However, it occurred to me that perhaps MS Access would be a better tool for phasing than Excel. When I download my AncestryDNA data, I get about 700,000 lines of data. That is a lot more data than Excel can handle easily. I will go through the Athey Paper and use Access to get results. However, I will not be giving a tutorial on Access as that would take too long.

Downloading AncestryDNA: Getting Rid of Zeros

Many people have downloaded raw data to upload to gedmatch.com. Ancestry raw data is in text form. Access gets along with Excel well, so first I import the AncestryDNA text data into Excel. Perhaps if you are curious, you have taken a look at your raw data to see what it looks like. Unfortunately, it takes a while to open up such a large file. Here is what a few lines of my AncestryDNA text file look like:

ancestry-text-file

It is important to note in the information above that Ancestry uses Build 37. That means that these results need to be converted to compare to Build 36. For example, Gedmatch uses Build 36. I remove the information above the column titles and bring it into Excel. However, I put my name on the top of the last 2 columns because eventually there will be columns for 4 people’s results (mine, my mom’s and my 2 sisters’). I will need to distinguish between each person’s alleles. It is important to note that when importing this text file to Excel, Excel retains the file as text. This is probably such a file as note that the no-calls have been changed to zeros. To save the file as an Excel file, you must specifically do that step.

Here is a file with the no-calls as blanks, like I want them, and with my name at the top and the verbiage removed:

joelallele12-text

Here is the file in Excel. I have used the search and replace in the last 2 columns. I want blanks for no-calls and not zeros which Excel likes to add.

ancestry-raw-excel

Using Access

At this point, I had to switch to my laptop as I don’t have Access on my desk top. I open up Access and name a new database. I go to External Data and choose the Excel icon with the arrow pointing up to import my 4 Excel Files of Raw DNA for Mom, my 2 sisters and me.

access-import

Next under Create, I choose Query Design. I choose the 4 Excel files that I have imported to Excel.

4-tables-in-query

I should note that when I imported the Excel files, that Access creates a unique ID for each row. I let Access do that. It has set that ID as a key identifier. I could have used the rsid as a key that is somewhat as a unique constant. Next I will connect each table by the rsid’s with something called an equal join. That is the dark line I added between the rsid Field for each persons DNA data.

equal-join

This means return the results when the rsid is the same for each file. Note the last table ( 2 images above) was wrong, so I took that out and added my sister Heidi’s Raw data table on the right. It is important to get the initial importing right and in the right format as this will save a lot of time later. Here is the form that I want the data in:

whit-table-1

This is a portion of Table 1 from the Whit Athey Paper. The difference is that Whit only had part of Chromosome 16. I will have all Chromosomes at once. In my Access query I choose the Excel Titles as Fields. I need the rsid, chromosome and chromosome position only once. Then I add the 2 alleles for each person. FTDNA uses right and left alleles. AncestryDNA uses allele 1 and 2. They are the same undifferentiated alleles.

fields-for-query

When I run the view the query results, I get this:

view-first-query-results

So with one push of the button, I have all the raw results of 4 people in my family in one area. I actually have more information than I need. AncestryDNA includes chromosome 24 and 25 which is YDNA and mitochondrial information that I don’t care about here. This is easily filtered out in the criteria section of the design view. I choose ‘Between 1 and 23’ there. That gives me each chromosome between and including 1 and 23.

chromosome-criteria

Now I am down from roughly 701,000 lines of data to the 700,000 lines that I want. It is important to save these results as a Table in Access as we will be using that Table to make more tables. Also save the query. Even though I say to do this, I didn’t. but just saved the results under the next step.

Whit Athey’s Principle 1

This Principle is simple and straightforward. It says that if you have two letters the same in your results, one of those came from one parent and one came from the other. In line 1 of my results above I have TT. All my siblings have this result also. My mother is already shown as TT as she was tested. My father who was not tested must have had a T which he gave to me and my 2 sisters. Here is Table 2 from Athey showing the next set of data that we need to produce the AncestryDNA raw data. Ancestry didn’t tell us which side each of our bases came from, so we will figure that out.

athey-table-2

I have only 3 siblings that I’m looking at right now, so I need 6 more ‘Fields’ in my database. There are a few ways to do this in Access. Here is one way that I did it.

Athey Principal 1 in Access: Homozygous Siblings

Homozygous is just a fancy term for my TT result found in the 1st position tested of my 1st Chrmosome. I created 6 more fields. These are to show what allele (letter) I got from my dad and my mom when I had a TT or other such homozygous results. Here is what the first field out of six that I added looks like on the Access Query Screen.

homozyous-sib-query

JoelFromDad is the first new field name. After the semicolon is the criteria. In English is says that if my allele1 is the same as my allele2, then put my allele1 in as the result I got from my dad. I used the same reasoning for a field called JoelFromMom and in similar fields for my two sisters. I viewed the results to make sure they made sense. I chose Make Table as I want the results in a Table to use later.

make-table

 I hit the Run button and created a Table called tblAncestrySibHomozygous. Here I have squished the results together.
tblsibhomozygous
The results are as above: MomAllele1,2, etc. Then I added in the last 6 columns: JoelFromDad; SharonFromDad; HeidiFromDad; JoelFromMom; etc. In the first line above, The T’s that we all had were added as contributed from our mom and dad. There appears to be an error on line 3. Note that there were no-calls for Joel and Heidi. What we got from Dad was right, but we shouldn’t know what we got from our mom, just based on our own results. I must have saved my next step to this table also.
Fortunately, when I view the original query, the results are correct:
qrysibhomozygous
Note now that the blanks that should be there in the end of the 3rd line are there. Now I have 700,153 lines of results showing where my 2 sisters and I got our DNA from each parents just based on our own ‘homozygous’ results. Good old Principle 1.
Another tip is that when you make a Table from a query, the order may be slightly different than what you want. To keep the same order, in the Sort row, choose Ascending for the chromosome and position.
sort-order

This will make sure that the chromosomes and positions within the chromosomes stay in the correct order. Otherwise, Access may try to sort by the first field which is the rsid.

Principle 2 in Access: Homozygous Parent

In my case, the homozygous parent is my mom. I spilled the beans already by my mistake above. In Line 3 above, my mom is GG. That means she had no other choice than but to contribute one of those G’s to each of her children at that location on Chrmomosome 1. Now I will put that Principle into Access language. For this portion I will use an Update Table. An Update Table will add new information to an existing Table. In this case, I added it to my tblAncestrySibHomozygous Table. That is why it showed the results already above. Here is what the Update Query looks like in design:

update-for-momhomozygous

Here I have the tblAncestrySibHomozygous Table which I reran (or un-updated). This query says for the criteria where Momallel1 equals Momallele2, update the JoelFromMom, etc Fields with the Momallele2 value. Obviously I could have chosen either of her alleles to update the fields as they are the same. In the bottom left of the image above there is a pink highlighted query called qryMomHomozygous for Table. That is this update query. the ! means that it is going to create something. I assume that the little symbol to the left of the ! means that it is an update query. I ran the query and then created a new table with the results called tableAncestryMomHomozygous. Again, what I had forgotten was that by running this query, I also updated tblSibAncestryHomozygous. It’s always good to do quality checks – especially when you are dealing with over 700,000 rows of results at one time.

I did the update and got a warning from Access that I was updating over 400,000 rows.  And that action cannot be reversed. Here is my old tblAncestryMomHomozygous to show the zeros that I didn’t like:

old-mom-homozygous

I’ll delete that table and replace it with the update on tblAncestrySibHomozygous that I just did. Here is the new table without zeros.
new-momhomozygous
I still had to sort the table to get it right. The trick is to sort the position first and then the chromosome and everything comes out in the right order. Notice that I got rid of my old zero problem. Now I have over 700,000 rows of phased DNA based on homozygous results. Next, I look at heterozygous DNA. Whoa.

Principle 3: Heterozygous Child

I’ll copy the Athey Principle as he stated it as it is slightly more complicated than the previous two:

Principle 3 — A final phasing principle is almost trivial, but it is normally not useful because there is usually no way to satisfy its conditions: If a child is heterozygous at a particular SNP, and if it is possible to determine which parent contributed one of the bases, then the other parent necessarily contributed the other (or alternate) base. This principle will be very useful in the present approach.

How to put Principle 3 into access?

Here is an example of heterozygous children alleles where the mother’s contributing base is known:

heterozygous-example

We know that each sibling got a G from mom as she only has G’s at this location. All the siblings have TG for their raw results, which means the T must have come from dad. I can go through over 700,000 lines and apply that rule or try to use the Access Update Query to produce the same results. This time I copied the tblAncestryMomHomozygous to a table called tblSibHeterozygous before I did the update to maintain the integrity of the older table. In the Update Query, I combined 2 steps. First I set a criteria that there has to be something in the JoelFromMom for this to work. So I said that JoelFromMom is not Null. Next, my allele1 is T. I want this to go into my JoelFromDad spot. If this T doesn’t equal the G I got from my mom, I am already heterozygous, so I don’t need an extra query for that. [That was the step that I didn’t need.]

Here is what I have for an Update Query:

query-heterozygous-allele2

However, note that instead of looking at allele1 here I chose allele2. I am thinking that this will be a 2 step process for each allele. This query is updating over 70,000 rows, or a little over 10% of all the data. I’m trying to show that this Update Query did not address my example above which had to do with allele1 and it didn’t:

allele2-query-heterozygous

The first line was my example. The 3 blanks in the first line are the bases from Dad that were not produced from the query as expected. However, it did work for the second line. In that case, my allele2 was not equal to the allele I got from my mom, so it inserted that allele (G) as the allele I got from my Dad. Next I’ll copy the query: qryHeterozygousSibsAllele2 and rename it as qryHeterozygousSibsAllele1. Then I changed 6 of the allele2’s to allele1’s. This is to cover my original example where allele 1 wasn’t the same as the base contributed from Mom.

allele1-query-heterozygous

In English: When allele1 doesn’t equal the allele that you got from Mom, put it in as the allele you got from Dad. This results in over 76,000 row changes. By the way, if I haven’t mentioned it, in the Update Query, the row that says Update To is the one where the update to your data is happening. So in the above example if Sharon’s allele1 doesn’t equal the one she got from Mom, that allele is then known to be the one from dad and is inserted in the correct place in a new table.

I check my updated table for good old rs13303118 and find:

update-allele1-sib-heterozygous

So I think that it looks pretty good. The first line is now filled in with our Dad’s contributing base. Also all the applicable following lines out of 700,000. There are some situations there should be blanks. In the third line, my mom is AC and I am AC. That is the situation where it is not possible to know what base came from what parent. So the base for each of my contributing parent is left blank – meaning that it is unknown.

One Last Step: Looking for Patterns

This is about as far as I’ve gotten and understood. The next issue that Whit Athey looked at in his paper were patterns. In his example there were 4 siblings tested, so more patterns. He added a column between the allele inherited from Dad and one from Mom called Dad informative pattern.

dad-informative-pattern

The idea is that there will be a pattern that lasts for a long time as we go down the results sequentially. These are the patterns of the segments that we inherit from our grandparents. Where the patterns change are the crossovers. Whit says to use those patterns to fill some of the missing letters. I haven’t started filling in the missing bases yet for a few reasons. One is that I’m not sure why I need to. In scanning the Athey paper there is a repetitive procedure of going back and forth between the data using the base from Dad’s side fill-in’s to help with the base from Mom’s side and then back again. First I’m not sure how to automate this yet. And if I could, how much better would the data be? I have quite a bit of data already. Once I get some answers of why I need to do this, I will continue on.

Here is a paragraph from the Athey Paper concerning the above Table 2:

Note the pattern of inheritance from Dad shown in Table 2 for the four siblings in the leftmost four columns. The first few rows show an AABB base pattern, but this gives way in about lines 12-13 to a new pattern, ABBB. Even though we only can see the pattern showing in some of the rows, these patterns persist over hundreds or thousands of SNPs, and can be assumed to exist also in the intervening rows where no pattern was discernable (and in the underlying sequence). Note that often there will be the same base in every location, a case of “accidental matching” which does not contribute to or detract from the pattern we are looking for. When two or more bases are different in a row, however, this represents an informative pattern—if any two are different, then since there are only two possible chromosomes contributing, it means we can see the chromosomal origins of the bases.

One of the reasons that I quote the above is to address the accidental matching where there was the same contributing parent base for each sibling. However, what I didn’t see addressed is that there are cases where that is not just accidental which I will discuss later.

Finding the crossovers

I do know the importance of finding the crossovers. I wrote a query in Access to cull out the patterns that Whit mentions.

query-for-patterns

Above is my query in design view using the table that has Principles, 1, 2, and 3 already applied. This query basically filters out the situations where the 3 siblings have the same base. The thought is that if one sibling has one base that is different from one of the others, then the three siblings’ will not share the same base.

results-of-dad-pattern-query

Above is the start of the results of the query. Note the XYX pattern. This should make it possible to fill in Heidi’s missing bases from Dad. It looks like multiple choice test answers, but I would add C, G, C, C, C and A in the last column for the bases that Heidi got from Dad.  My homework assignment is to find a formula to fill in those letters so I don’t have to do it manually 10’s of thousands of times.

Another thing I want Access to do is find where the crossovers are. Here I scrolled down all the bases the my sisters and I had from Dad. I can see where the XYX pattern changes to XYY:

change-in-dad-pattern

But there was a problem. the XYX pattern stopped at position 18,759,377 and the XYY pattern started at 23,288,828. That means we have a large area with no pattern. Exactly. That is the area of XXX pattern that I just queried out. That has to be the area where all three siblings match the same paternal grandparent.

Checking my results with m macneill’s work

Fortunately, I have secret weapon. M MacNeill – prairielad_genealogy@hotmail.com has also been looking at my raw DNA using his own Excel spreadsheet method. Here is what he has for Chromosome 1:

macneill-chr1

Now just look at the first 3 red bars above. They represent my paternal side. The first break would be on Sharon’s bar – the third red bar from the top. The end of her dark red bar is at 18,631,964:

sharon-chr-1

Look at Sharon’s bar in that region and then scan up the 3 red bars. There is an area where all three siblings match on the paternal grandmother side (lighter red).

That is my paternal XXX Pattern.

To satisfy my curiosity, I went back to my unfiltered/unqueried table at the spot that the first pattern changed from XYX to XXX. The end of the first base pattern from Dad is highlighted in blue.

xyx-to-xxx

Line 2 is a no-call. Line 3 is one of the random XXX matches in the XYX pattern area that Athey mentioned above. Note that I could not likely fill in line 4 with what I know as I don’t know if that should be AAA, AGA, or something else. Actually, I could fill in Heidi’s with an A. If her results are AAA or AGA, Heidi still gets the A from Dad. It is only Sharon’s base from Dad that I don’t know.

However, starting at CCC, it seems like it would make sense to fill in all the letters in the XXX pattern area – even if there is only one known base out of three.

Converting Build 37 to Build 36 positions

At the top of the Blog I had mentioned that AncestryDNA results were in Build 37. M MacNeill’s work is in Build 36. I really didn’t want to have to convert results and thought that I was being clever by using all AncestryDNA results. However, to compare to M MacNeill’s Map above or to Gedmatch results, I still have to convert positions. Hey, life is tough.

NCBI genome Remapping service

Fortunately there is a way to convert positions here.

conversion

Assuming we are all homo sapiens, we select that choice and we select that we want to go from Build 37 to 36:

build-37-to-36

Here is the place to enter the data we want converted. It has to be in the format below – “chr1:” followed by the position number.  There is also a place to upload a file which I haven’t tried.

data-for-conversion

These are the 2 positions from my query where one pattern stopped and another started. Here is what they look like in Build 36 under Map Location:

chr-conversion-results

These Build 36 position numbers match up perfectly with M MacNeill’s map positions which gives me some confidence. This is where I’ll end Part 1.

I have found 2 paternal crossover points. However, I have not yet figured out which siblings they belong to – unless I cheat and look at the MacNeill Map above. I can easily do the same thing and find the pattern changes for the maternal side. I have shown 2 crossovers, but all the others exist in my query for 23 chromosomes. I just haven’t looked for them yet.

Summary

  • The Whit Athey Paper has been very helpful in phasing my raw DNA based on my mother and 2 siblings test results.
  • M MacNeill has piqued an interest in raw DNA data that I never thought I would have
  • M MacNeill’s Chromosome Maps are very helpful in checking my work
  • MS Access appears to be a great tool to use to quickly phase a lot of raw DNA
  • There is probably no way around DNA remapping or conversions
  • I still need:
    • An easy way to find all the crossover points
    • A formula to fill in the various patterns
    • A good reason to fill in those missing bases
  • I have a lot more to learn about DNA phasing using raw DNA data


More Hartley DNA – Patricia’s DNA

This blog is a follow-up on my last Blog: My Hartley Autosomal DNA. I was inspired to write that blog following this year’s Hartley reunion in Rochester, Massachusetts. I intended to send around a little poster I made up about Hartley DNA and get a DNA sample from my father’s cousin Martha, but didn’t get a chance to. Instead I wrote a blog. I did talk to Patricia though. She is my second cousin and the sister of my childhood best friend, Warren. She had taken an AncestryDNA test. I think her daughter bought it for her. I asked if she could upload her DNA to gedmatch.com and she said that her daughter would be good at doing that.

Here are Patricia’s 2 brothers and Patricia. The one in the middle was my best friend in my first 6 years of school. I remember seeing home movies of Curtis, Warren’s older brother. He came to one of my older siblings’ birthday party when he was about this age.

Patricia and family

In my last blog, I wrote about the Hartley DNA matches my father’s first cousin Jim had with me and my 2 sisters. I was surprised to find out that every match that we had represented one of my four 2nd Great Grandparents. They were all born around the 1830’s. It turns out that Patricia’s matches with cousin Jim represent the same four 2nd great grandparents. In addition Patricia’s DNA matches with my 2 sisters and me represent the same four old timers.

Here is what my DNA match to Patricia looks like at AncestryDNA:

Patricia Ancestry

Here, AncestryDNA has it right that we are 2nd cousins. They show we match for a total of 206 cM (centimorgans) across 14 DNA segments. That is about all you can get out of ancestry. They won’t tell you which chromosomes we match on or how much we match on each chromosome. That is why people upload their results to gedmatch.com. Ancestry does show other people that match DNA to both Patricia and me. These are my 2 sisters and 5 others. All these people also descend from the same Rochester Hartley ancestors, but none of them have uploaded their results to gedmatch.com, so we don’t know their detailed DNA matching information.

Here is the same match between Patricia and me at Gedmatch:

Pat Joel Gedmatch

Ancestry has 14 segments vs. the 8 at Gedmatch. But at Gedmatch we know on which chromosome we match, how much on each chromosome and the exact start and stop location on the Chromosome. However, even with Ancestry’s 14 segments, their total is a bit smaller. Here is how I match Patricia on Chromosome 15 in the Gedmatch Chromosome Browser:

Joel Pat Chr 15

The blue areas represent the two DNA matches Patricia and I have on Chromosome 15.

Patricia on the Hartley Family Tree

Growing up, Patricia’s grandmother was my great aunt and also one of my neighbors, my Aunt Mary.

Patricia's Tree

The bottom box in each row are the people that have tested their DNA and uploaded to gedmatch.com. I now show 3 of the 13 children of James Hartley and Annie Louisa Snell (James, Mary and Annie). I now can check how my sisters and I match Patricia’s DNA as well as how Patricia matches Jim’s DNA.

Here are my great grandparents and three of their older children.

James and Annie Hartley

It is in interesting photo. Two of the children are looking away. I think that one is my grandfather James. The mother, Annie, is looking at something in her hands. The older son Dan is looking at a book and the father James doesn’t look comfortable being dressed up.

Patricia’s DNA at Gedmatch

One of the basic functions at gedmatch is called ‘One to Many’. In this case, I took Patricia’s DNA and compared them to everyone else that has ever uploaded their DNA results to gedmatch. Here are her 1st 4 matches:

Patricia's 1st 4 matches

Not surprisingly, her top matches are her 1st cousin, once removed, Jim, me and my sister’s Sharon and Heidi. The Gen column lists how far away gedmatch thinks Patricia’s matches are to a common ancestor. Patricia and I are 3 generations to James Hartley and Annie Snell, so that is right. Patricia shows 2.6 generations to a common ancestor with her match to Jim. A first cousin once removed would typically be 2.5 generations, so she shares a little less DNA than average here with Jim. Patricia also shares 19.3 cM of the X Chromosome with cousin Jim which I find interesting.

The Hartley X Chromosome

I’m taking the X Chromosome out of order because I find it interesting. There is one most important thing to know about the X Chromosome. If you are a male, you get one from your mother. If you are a female, you get one from your mother and one from your father. My father only got an X chromosome from his Frazer mother, so he doesn’t match anyone further up on the Hartley line by the X Chromosome. However Patricia and Jim both have maternal matches that carry up the line.

Here is how Jim got his X Chromosome from his mother and her ancestors:

Jim's X Inheritance

Jim only inherited his X Chromosome from those ancestors in pink or blue. So, for example, he got no X Chromosome from any Bradford before Harvey Bradford.

We need to compare Jim’s chart with Patricia’s X Inheritance Chart:

Patricia's X Inheritance

Here I didn’t show the X Chromosome that Patricia got from her father as this won’t match Jim. Then of what I show, only the bottom half will match Jim. This means that going back 4 generations from Patricia, she could match Jim by the X Chromosome on the Emmet, Snell or Bradford Line. One other difference between Jim and Patricia is that Jim got 100% of his total X Chromosome from his mother and Patricia only got 50%. However, that is a confusing way to put it because Patricia did get 2 X Chromosomes. So her one 50% must be similar to Jim’s 100% if that makes sense.

Here is what the X Chromosome match looks like between Patricia and Jim at gedmatch.com on their browser:

Jim Patricia X Match

The yellow part with the blue under it is where they match at the end of the X Chromosome. That is enough on my X diversion for now.

Back to the Hartley DNA Matches on the Other 22 Chromsomes

At gedmatch, I go to the Jim’s ‘One to Many’ matches to see how he matches my family and Patricia. Here are Jim’s top 4 matches. You may have already guessed who they are:

Jim's top 4 matches

Above, I said that Patricia matched Jim a little less than expected. My sister Heidi at the top of the list matches him a little more than average.

Here are Jim’s DNA matches on Chromosome 1

Pat Chr 1

  1. Me
  2. Heidi
  3. Sharon
  4. Patricia

Here Patricia has identified a new piece of DNA in green that is a Hartley ancestor that we didn’t know about before. Again, this “Hartley” ancestor may be Hartley, Emmet, Snell or Bradford.

Here is another new Hartley segment on Chromosome 2:

Pat Chr 2

Patricia matched Jim on Chromosome 2. My sisters and I had no match with Jim on that Chromosome.

It looks like Patricia got a double segment of Hartley DNA on Chromosome 5:

Patricia Chr 5

Patricia is #1 above. Where the color changes from orange to yellow likely represents a change from Greenwood Hartley to Ann Emmet DNA or Isaiah Snell to Hannah Bradford DNA.

Patricia Helping Me Map My Chromosome 7

I’ve tried to map all my chromosomes as well as my 2 sisters’ to my 4 grandparents. I got a little stuck on Chromosome 7:

Chr 7 Map Pat

My chromosome 7 depiction is the one with the J to the left of it. On my paternal side (which is the blue (FRAZER) and red bar), I have the DNA I got from my dad’s mother in blue and my dad’s Hartley dad in red. Above that is the gedmatch depiction of how I match my 2 sisters by DNA and how they match each other. The bright green bar is called the Fully Identical Region or FIR. This means wherever that occurs a sibling matches the other sibling by getting the same DNA from the same 2 grandparents (one maternal and the other paternal). So in comparing Sharon to Heidi, they have that FIR from 0 to 25. It turns out that their 2 grandparents were their mother’s mother (Lentz) and their father’s father (Hartley). In the tiny section between 0 and 4, I have what is called a Half Identical Region or HIR. That means that I shared one grandparent’s DNA  with my sisters and the other grandparent I didn’t get any of their DNA. In this case I had to share either the Lentz or Hartley grandparent with my 2 sisters, but I didn’t know which.

That is where Patricia’s results came in handy. Here is how she matches Sharon, Heidi and me:

Patricia Chromosome 7

Patricia has 3 good matches with Sharon and Heidi and one tiny one with me (#3 on the Chromosome Browser). However, the tiny one is the one I need. The pink match shows that my Chromosome 7 from 0-4 (in millions) is where I got my DNA from my Hartley grandfather and not my Frazer grandmother.

Here is my completed Chromosome 7 thanks to Patricia. I extended the Rathfelder on my Chromosome 7 all the way to the left or beginning and added a small chunk of red Hartley from my grandfather.

Chr 7 complete

Another Type of Chromosome Mapping

There’s is another type of Chromosome Mapping developed by Kitty Munson. The way the Munson Mapping is generally used is to map out your relatives’ common ancestors. In the case of Patricia and Jim our common ancestors are James Hartley and Annie Louisa Snell. Here is what my new Chromosome Map looks like with the addition of Patricia’s DNA matches with me shown in blue.

New Kitty Map for Joel based on Pat

Well, that’s about enough for Patricia’s DNA for now.

Summary and Conclusions

  • Patricia shared the first Hartley X Chromosome match that I’ve seen.
  • The X tends to shy away from the male line, so Patricia and Jim’s match is more likely down somewhere in the Massachusetts colonial line rather than the English Line.
  • I would like to use Hartley DNA to break through the Hartley genealogical brick wall. Right now I’m stuck in the early 1800’s in Trawden, England. There were too many Hartleys there with the same first name to figure out who was who. Patricia’s DNA may help in finding matches to other Hartleys
  • Patricia’s DNA helped me in mapping my chromosomes in 2 different ways.


My Hartley Autosomal DNA

I have written many blogs on DNA but I don’t think that I have written about my Hartley autosomal DNA. Autosomal DNA is the kind of DNA test of which Ancestry claims they have tested over 2 million people. Autosomal looks at the DNA we get from both our parents and their parents and so on until the DNA runs out. And it does run out for some ancestors at some point. Due to this effect, very little of my DNA is actually Hartley DNA. If you think of it, I got half of my DNA from my father, but he got half from his father, his father got half his DNA from his father and so on.

Paternal DNA from Maternal DNA

The best way to get your paternal DNA is to test your father. This avenue was not available to me. However, I was able to test my mother. Gedmatch.com has a utility available that will separate out the DNA I got from my mom from that which I got from my dad. That utility does not recreate my dad’s DNA, but it does recreate most of the portion of DNA that I got from him.

Here is what the utility looks like. It is quite simple to use and works quickly.

Phased Data Generator

Once I have this information, I can run the results against all my matches to find out which of my matches are from my dad and which are from my mom. There are also those that match neither which may be considered false matches. This takes out a lot of the guesswork with our matches. It makes life twice as easy.

Paternal DNA from Testing a Paternal Relative

The other way to find paternal (that is Hartley) DNA is to test a paternal or Hartley relative. That is when I went to my father’s cousin Jim and asked him to take a DNA test. He was willing and I have some Hartley matches. I also had tested myself and my two sister’s. Here is what Jim’s DNA results look like compared to me and my 2 sisters on a Chromosome Browser:

Hartley DNA

I find this graphic interesting. It shows that Jim matches me and my 2 sisters on almost every chromosome. The last chromosome is the X Chromosome. It was cut off a bit. However, Jim could not match us on the X as my father only got his X Chromosome from his mother who was a Frazer and not a Hartley. On Chromosome 13 my 2 sisters and I have pretty much the same match with Jim. The 3 bars are of equal length. On Chromosome 20, only my sister Sharon matches Jim. On Chromosome 11 we all match but at different amounts. My sister Heidi has the largest match there. The places where we don’t match, my family is busy matching the other 3 grandparents. Or perhaps Jim is busy matching on his father’s non-Hartley line.

What Do All Those Matches Mean?

All those matches represent Hartley DNA. But remember that I said that even our Hartley DNA consists of other families. So the answer is a bit more complicated. First I will show the Hartley genealogy relative to the DNA match between Jim and my family. That will help explain all these DNA matches. In the first line below, Greenwood Hartley was from Trawden, England. Ann Emmet was from Bacup, England. Isaiah Snell had non-Pilgrim colonial ancestors. Hannah Bradford had Pilgrim Colonial ancestors.

Greenwood DNA

I have those with Hartley DNA in green. Those that have no Hartley DNA are in blue.

Here is Greenwood Hartley and Ann Emmet:

greenwood

Probably Hannah Bradford and Isaiah Snell at their house in Rochester, Massachusetts:

Hannah Isaiah

Every match between Jim, me and my siblings represents a specific Ancestor from the 1st line above

The common ancestors between Jim and me are James Hartley born 1862 and Annie Louisa Snell born 1866, but the DNA represented between Jim and me is actually their parents who were all born around the first third of the 1800’s. This was just made clear to me within the last few days. I know, it gets confusing. That means that out of the 1/4 of my DNA that is Hartley (as I have 4 grandparents), only 1/4 of that quarter is Hartley when we go back to where the DNA came from. That means that every orange, blue or green bar in the first image represents one of the 4 ancestors from the early 1800’s above.

How We Get Our DNA

When we were conceived, we got our own blend of DNA. That DNA was really from our 4 grandparents. We got equal amounts from our mom and dad, but the amounts we got from their parents was blended and we may have not gotten an exact 25% from each our grandparents. We all actually have 2 of each chromosome. One is paternal and one is maternal. For example, the siblings James Hartley b. 1891 and Annie Louisa Hartley b. 1902 received on their paternal chromosome alternating segments of Greenwood Hartley and Ann Emmet DNA. Likewise, on their maternal chromosomes, they had alternating DNA from Isaiah Snell and Hannah Bradford. Those mixtures of their 4 grandparents was passed down to Jim, me and my 2 sisters and is represented in the Family Tree DNA Browser that I show above and again below.

How Can We Tell Which Segment Matches Which of the Four Ancestors?

For example, it would be nice to know if Heidi’s Chromosome 11 match with Jim shown in green below represents  Hartley, Emmet, Snell or Bradford.

Hartley DNA

The best way to find out which segment represents which ancestor is to do additional testing.

Test:

  • A Hartley relative not related to Emmet, Snell or Bradford
  • An Emmet relative not related to Hartley, Snell or Bradford
  • Etc.

Well, I think you get the picture. Once one of these people is tested, they would be a reference and any match Jim or my family had with them would be from the Hartley, Emmet, Snell or Bradford lines. The problem is, where are these people? There may be Snells around not related to Hartleys, but I dont’ know of many Hartleys not related to Snells. Sorry for the double negative.

Another way is to wait until one of these Snells not related to a Hartley shows up on a DNA match list. This doesn’t work for Ancestry matches because AncestryDNA doesn’t tell you which chromosome you match on. However, if they were to upload their results to gedmatch.com, then the segments could be identified.

why do we want to identify these segments?

Well, for one, some find it interesting to know where they got their DNA from. Another reason is, that once these are identified, then we know right away where to look for an ancestor match. For example, if we knew a match was on the Bradford side. We would look for a common matching ancestor descending from the Mayflower perhaps.

Summary and Conclusions

  • When I tested my Hartley father’s 1st cousin, I got a lot of DNA matches on most of my chromosomes
  • These matches represent 4 of my 2nd great grandparents
  • These four 2nd great grandparents represent Trawden and Bacup, England and Colonial Pilgrim and non-Pilgrim lines.
  • So far, I have not been able to figure out which colored bar represents which 2nd great grandparent.
  • There may be some advanced techniques that could help me tease those out. Or I may be able to find those out by testing appropriate relatives if found.
  • The older generations are the best for testing as the further you get from your ancestors, the less autosomal DNA you carry. It reduces by a factor of 4 every generation.
  • Those relatives that have tested at Ancestry should upload their results to gedmatch.com for comparison.
  • One of my Hartley 2nd cousins has uploaded her DNA results to gedmatch.com and that will be the subject of my next Blog.

My Hartley Big Y Results: Part One

Back before I got my Big Y results, I wrote an article called My Hartley YDNA. This covered issues relating to Hartley SNPs and STRs. As many know, the Big Y is the ultimate Family Tree DNA product for testing the YDNA that is passed down from father to son since the beginning of such passing down of YDNA. While other YDNA tests identify existing STR and SNP markers, it is the purpose of the Big Y to look at one’s DNA and discover new SNPs.

Hartley Big Y Testees

As far as I know there are a total of 3 Hartley Big Y testees – including me. I am correctly but awkwardly saying testees as the testers are those in the lab testing the DNA. I may slip back to the more comfortable ‘tester’ at some point.

William on the I Line

The first Hartley to have the Big Y is William who is the Hartley DNA administrator. He is in the I Haplogroup. In the old nomenclature, he would be along the line of I1a2a1a2. I1 and I2 are the main I branches and are extremely distantly related to other known Hartleys – at least by YDNA. Other Hartleys so far tested have been R1b.  I agree with what William says about his connection to other Hartleys:

My last common [I1] ancestor was about 1,800 years ago and also likely an Angle [Anglo-Swedish Angle]. So that commonality may be why we both later adopted the Hartley surname and both our ancestries are found around Yorkshire and Lancashire.

I added the I1 in brackets for clarification.

The second Hartley Testee: James Hartley ancestor – R1b-S1051

The second Hartley testee was more closely related than the I1 Haplogroup. We are both in the R1b group.  Further, we are both in the L21 group. This group has sometimes been associated with the Celts. L21 is also associated with the older peoples that lived in the British Isles prior to the arrival of Vikings, Anglo Saxons and Normans. However, our common ancestor was likely 1,000’s of years ago.  The second Hartley testee is in a tiny branch called S1051 which I have pointed out with a red arrow. I am in the gold regions of L513 a few steps up from S1051

L21 Tree S1051

This chart is from July 2015. I believe that it is no longer updated as it has gotten so crowded due to Big Y testing. There are 151 people in the R-S1051 Project. According to the R-S1051 Project web page:

Recently many new SNP’s have been discovered for this unique haplogroup which is located below DF13. 

The majority of this family group have 5 main Patriarch SNP’s (S1051, FGC9655, FGC9661, FGC9658 and FGC9657). The current age estimate for these Patriarch SNP’s is approximately 3,200 to 4,500 years old and likely originated within what is known as the Bell Beaker culture. When examining other haplogroups of a similar age the S1051 people are very few by comparison.

Evidence suggests that the geographic origin of this family group could have been from what is now modern Scotland.

Our fellow Hartley Big Y testee #2 is on the FGC9655 Line. Here is my attempt to spray paint out the IDs below on the Alex Williamson Big Tree:

Alex S1051 tree

It looks like our Hartley has the most Big Y company in the R-S1051 Group. The belief is also that the Hartleys came from the North of England originally. This theory that this S1051 group was from Scotland originally would tend to support the Northern UK origins of the Hartleys. Brewer in the reddish color has not been analyzed yet, so things are still developing in the FGC9655 SNP Group.

That is a good segue into my results. I called this blog Part One because, like Mr. Brewer, my results have not been analyzed yet either. Due to all the Big Y testing recently, there has been a bit of a backlog in analyzing the results.

The Third Testee (Me) – R-L513

I already knew where I was on the L513 Chart. Now, due to the fact that I have taken the Big Y test, I am listed on the top part of the tree. This is like being elevated to YDNA Heaven.

L513 Tree June 2016

Here is a closer up shot:

L513 Blowup

I am hoping that other Hartleys will test and find to be positive for Z17911. Like Hartley Big Y Tester #2, I am in the Big Tree. Unlike Tester #2, my data has not been analyzed by Alex Williamson, so I am still shown in a reddish color. This time I’ll erase the kit numbers for privacy:

Hartley on Big Tree

Way at the top, there is Smith. He is positive for a SNP named Z16357. All the other names share the Z16357 SNP with Smith. Smith does not share Z16343 and the block of other SNPs listed below with Hay(e)s, Pillsbury, Merrick, Thomas and Hartley. The tree portion above shows that Hay(e)s is down from the Pillsbury Line. Merrick, Thomas and Hartley have only 2 named SNPs: Z17911 and Z17912. A few other observations:

  • If one is positive for Z16343, then they are likely positive for most or all of the other SNPs listed in the Z16343 block
  • There is no one currently that is positive for Z16343 that isn’t also either Z17911 or Z16855
  • If we maintain the 150 years per SNP, then the block of about 25 SNPs in the Z16343 block could represent 3,750 years. There are some detailed reasons why that number of years could be less. However, it is still a long amount of time.

Public SNPs, Private SNPs, Terminal SNPs

But wait, there’s more. There are different categories of SNPs with different names. The terminology can get confusing. A terminal SNP means the last SNP on your line that you could be based on current knowledge. For me, that is Z17911. However, what was terminal in the past, what is terminal now and what may be a terminal SNP in the future are different things.

Public SNPs are those SNPs with listed names such as Z17911 or those in the block under Z16343. These are also a moving target. At one time, these SNPs were just position numbers.

Private SNPs are those that are not yet public SNPs or may be family SNPs. Family SNPs are those that just belong to a single family name – probably within a genealogical time frame. So, if your genealogy goes back 350 years, there could be on average 3 SNPs during that time. Those would be considered family SNPs.

Novel Variants and unique SNPs

FTDNA reports Novel Variants. In my Big Y test, I have 30 Novel Variants listed. Those that are not shared by anyone else would be considered my unique or private SNPs. Note that this definition of Private SNPs bumps up against the Private SNP definition that I had above which was a family SNP. This means that either I have it wrong or there are 2 different ways of looking at Private SNPs.

Here is a screen shot from an excellent video called,

Building a Family Tree with SNPs, STRs, & Named People (Maurice Gleeson)

Maurice SNP Types

Hopefully the above diagram simplifies my complicated explanation.

The Mike Walsh L513 Discovery Spreadsheet

I am fortunate to be in the R-L513 Haplogroup with Mike Walsh as an administrator. He is very active in that group looking for new people to further test and for people who aren’t in the group already but perhaps should be due to the signature of their STR tests. He has developed a Discovery spreadsheet based on the Big Y results – specifically from the VCF files. VCF stands for Variant Call Format. Here is part of his file for my little piece of the YDNA world which includes Hay(e)s, Pillsbury, Thomas, Merrick and Hartley.

Walsh Discovery

Here we have the SNP position number. The H is the YDNA group based on STRs. The status looks to be Public consistent, public semi-consistent, multi-family surname or single family surname. These statuses are analogous to the public and private SNPs that I was mentioning above. Grade is how good the SNP is. Frequency is how many times it occurs – in this case out of the 6 people in the test group. Then the results are colored according to the grade and other factors for Hayes, Pillsbury, Hartley, Merrick and Thomas. Note that the SNPs with poor grades were never named. They are just position numbers.

Z17911

Here is the second page of the Discovery Spreadsheet:

Discovery p2

The blanks are no-reads. These would be inconclusive. Red means that there was a read, but the SNP was not present. This shows that for the Z17911 and Z17912 SNPs, Hayes and Pillsbury were negative and Hartley, Merrick and Thomas were positive. That is how these two groups separated ways and are on different branches of the L513 SNP Tree.

Does the Spreadsheet tell us anything new?

When Mike first added me to his spreadsheet, he noted the following:

This isn’t on the Big Tree but Merrick and Thomas have this which you do not have:
19581481-G-A

Here is the unnamed SNP Mike mentioned that I don’t have:

Discovery part3

Note that Hayes, Pillsbury and Hartley are negative for 19581481 and Thomas and Merrick are positive for it. This was a little different than the Z17911 above. It appears that 1951481 at the bottom of my screen capture may become a named SNP for Merrick and Thomas and put  them in a branch below me. So perhaps my Big Y has helped someone else after all. Perhaps the next Big Y tester will in this region will help me out.

The YFull Analysis

While I am waiting for Alex Williamson’s analysis, I am also waiting for a YFull analysis. This is a company in Russia that will look at the BAM file from the Big Y test. They will add my results to their YFull tree. They also give estimated dates to my SNPs. Finally, they will, as a lesser priority, find STRs that they can extract from the Big Y test. The only downside is a small fee and that I will only be compared to others that are in the YFull system.

YFull